I want to try to get some pics after I get my bike back together today. I had to re-open my headlight and put the shroud on my projector back on after some jerk decided to kick my bike over the other night. I did something a little different with my headlight housing.

Navigation
Install the app
How to install the app on iOS
Follow along with the video below to see how to install our site as a web app on your home screen.
Note: This feature may not be available in some browsers.
More options
-
Welcome to the Yamaha FZ6R Forums. Member registration disables ads and allows you to post and share. Register Here.
You are using an out of date browser. It may not display this or other websites correctly.
You should upgrade or use an alternative browser.
You should upgrade or use an alternative browser.
Retro Fit kit
- Thread starter cavcuz05
- Start date
qnoisx
New Member
Do you guys get any fogging inside your headlight casing? I finished with my mine last night. Just kinda jury rigged up the extra lights for now. Anyways, rode to town and back to test out the headlight and the gem completely fogged over and there was some fogging of the lower section as well. I'm thinking I need to take the headlight back out and make sure it's sealed better. The seam seemed to be sealed well, but might need some help. I know around the back the rubber around the bulb isn't that sealed. Had to cut out the middle to fit the connector and the wires from all the auxiliary lights don't help the fit around the edge.
Don't know if you guys have a similar issue or not.
Btw, the hi beam is pretty nice, much better than stock. Low beam works pretty well, but that cutoff is brutal. You see nothing beyond it. Too bad it's not just tinted.
Don't know if you guys have a similar issue or not.
Btw, the hi beam is pretty nice, much better than stock. Low beam works pretty well, but that cutoff is brutal. You see nothing beyond it. Too bad it's not just tinted.
I did at first, but then I took the headlight back out and then went all around the outside seam with silicone, and I didn't have any issues after that. The back boot, I cut just the middle enough to get around the nut that holds the bulb in. I put silicone around the wires that I have coming out for my angel eye, led strip and solenoid. I haven't had any issues with condensation since I did all that.
qnoisx
New Member
Ah, okay sounds like I need to do the same. I was thinking about cutting a slit for the wires, but didn't. Guess I need to do all that. Ah well, off the fairings will need to come again. Might wait till I get my auxiliary wiring kit and handle bar switch. Right now I'm going to go finish fixing my windshield and take some pics like I promised. The Madstad windshield is nice, but a real bitch to get it just right. There are 8 sets of adjustment bolts that have to be loosened and tightened, which is really hard to do with the windshield on.
qnoisx
New Member
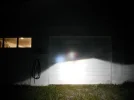
Here are a few shots of the headlight with everything on. Noticed that the inverter for the CCFLs was hanging loose before taking it... Apparently magnets are a bad way to mount it. Just another thing to put on the to do list.
Attachments
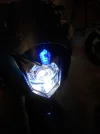

That looks awesome man!! Great work. Looks like your hard work really paid off. Keep up the good work and good luck with the condensation.
- Thread starter
- #247
cavcuz05
New Member

KingDP
New Member
Quick question for you guys. What shroud do you recommend going with if i was to get the single CCFL angel eye? i was going to go with the GTi-R but im unsure how it will turn out.
- Thread starter
- #249
cavcuz05
New Member
I did at first, but then I took the headlight back out and then went all around the outside seam with silicone, and I didn't have any issues after that. The back boot, I cut just the middle enough to get around the nut that holds the bulb in. I put silicone around the wires that I have coming out for my angel eye, led strip and solenoid. I haven't had any issues with condensation since I did all that.
thats what i did from the start...zero problems...i almost want to open mine back up to and 1. paint the rest of my shroud and 2 re adjust the beam
- Thread starter
- #250
cavcuz05
New Member
Quick question for you guys. What shroud do you recommend going with if i was to get the single CCFL angel eye? i was going to go with the GTi-R but im unsure how it will turn out.
black and myself have the gti-r and qnoisx has the ocular
KingDP
New Member
black and myself have the gti-r and qnoisx has the ocular
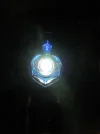
Yours doesnt have the CCFL halo though right? or is it tucked behind the shroud and lights up the 6 spheres around it?
Yours doesnt have the CCFL halo though right? or is it tucked behind the shroud and lights up the 6 spheres around it?
Mine has the CCFL behind the shroud...but because I have the side emitting lights, it isn't very visible, because the LED's are extremely bright.
KingDP
New Member
I see. Also a quick question for you FZRBlack, what did you use to paint your reflector / headlight housing black?
Sparkxx1
New Member
Did you lose any light output because you painted?
Midnightroadie sold me his kit and I'm waiting for it to arrive, so I'm thinking of painting the inside
Midnightroadie sold me his kit and I'm waiting for it to arrive, so I'm thinking of painting the inside
KingDP
New Member
Did you lose any light output because you painted?
Midnightroadie sold me his kit and I'm waiting for it to arrive, so I'm thinking of painting the inside
I think the light output remains the same because once the projector is in place the reflector is pretty much not used.
I see. Also a quick question for you FZRBlack, what did you use to paint your reflector / headlight housing black?
Krylon Fusion Spray paint. Made specifically for plastics. Liquid gold if you ask me.
Did you lose any light output because you painted?
Midnightroadie sold me his kit and I'm waiting for it to arrive, so I'm thinking of painting the inside
I think the light output remains the same because once the projector is in place the reflector is pretty much not used.
No, the housing isn't used at all. You will see after installing, the projector concentrates the light with the lens, you don't need a reflector at that point. Paint away!!!
- Thread starter
- #257
cavcuz05
New Member
glad to see my DIY isn't being referenced...all these questions aside from the additional led lights are there...i used just regular high temp paint...used it for all my retro fits...0 problems
Last edited:
qnoisx
New Member
I ended up not painting anything in my stock housing. I use the stock reflector to glow blue with the CCFL I put behind the projector. Just waiting for a inverter connector to wire it up permanently. If you wanted, you could put in an Angel Eye behind the projector instead and use that as a running light. Just have to mod your headlight with an on/off switch. Getting a dual Angel Eye kit and putting one in front like I did and behind where my blue CCFL is would light up pretty well. Dunno about how legal it would be in states that require an always on headlight for motorcycles though.
Btw, I'm ordering the 50 watt ballast and bulb combo to try out. I ride at night a lot and want to see if it makes a big difference in brightness. Noticed our original bulb is 55 watts, so the bike should be able to handle the power requirements. I'll try to take some good comparison photos. Cameras can be annoying when trying to compare two light sources, so we'll see.
Btw, I'm ordering the 50 watt ballast and bulb combo to try out. I ride at night a lot and want to see if it makes a big difference in brightness. Noticed our original bulb is 55 watts, so the bike should be able to handle the power requirements. I'll try to take some good comparison photos. Cameras can be annoying when trying to compare two light sources, so we'll see.
qnoisx
New Member
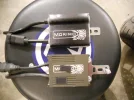
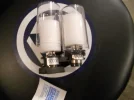
It took a while to get the last set of parts in, but I'm ready now. I ordered a fuse box to hook all my accessories up with since the battery post was full. The new bulb and 50w ballast arrived also. Here are the comparison pics as promised. Wish I had a light meter to determine that exact difference, but I don't. I used my 90 lumen led flashlight as a comparison light source instead. Photo key: Ballasts, bulbs, 35w beam, and 50w beam.
Attachments

qnoisx
New Member
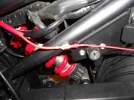
Btw, if you plan to use a fuse panel with your retro kit, you'll need to modify the wiring harness. For one, the fuse panel will probably take bare wire, so you won't need the battery post clamp. You also won't need the inline fuse. Lastly, the wire that goes to the battery is too short to reach back under the passenger seat. So the solution to all 3 problems? Just pull the fuse out of the inline fuse holder. Pull the wire on the headlight end out of the fuse holder. Then just cut a new 18 gauge or greater wire that's long enough to reach from wire you just removed to the fuse panel. Then crimp the male connector end to your new wire and connect it all together. You can save the short wire that went from the inline fuse to the battery for some other project.
Pics:
Pics:
Attachments

Similar threads
- Replies
- 40
- Views
- 8K
- Replies
- 86
- Views
- 14K
- Replies
- 22
- Views
- 30K
- Replies
- 7
- Views
- 1K