
Navigation
Install the app
How to install the app on iOS
Follow along with the video below to see how to install our site as a web app on your home screen.
Note: This feature may not be available in some browsers.
More options
-
Welcome to the Yamaha FZ6R Forums. Member registration disables ads and allows you to post and share. Register Here.
You are using an out of date browser. It may not display this or other websites correctly.
You should upgrade or use an alternative browser.
You should upgrade or use an alternative browser.
Intagraded LED Tail Light (XJ6 onto FZ6R)
- Thread starter cbzdel
- Start date
Tabitha
New Member
I put all the pics we took of our install in an Album entitled Integrated Tail Light Install, for those who want to take a look. I haven't labeled all of them yet.
joloy133
New Member
With led lights during daytime they aren't as bright unless you're directly behind them. At night they're brighter, imo.
mtucker
New Member
Definatly interested in seeing a video of this. I would love to get rid of my signals.
Roaddawg
New Member
With led lights during daytime they aren't as bright unless you're directly behind them. At night they're brighter, imo.
I noticed when we went riding with Arcflash that he only had the one center row lit up, and you couldn't hardly see it in the daylight. The one Tabitha has is lit up quite a bit more.
arcflash316
New Member
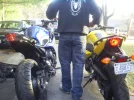
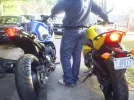
Yes the running lights are 1 center row and when the brakes are applied the whole thing lights up, then the blinkers are just a different set of orange lights inside the same area flashing around the red lights
also her brake lights appear to be activated by her husband
his hand is on the brake lever
also her brake lights appear to be activated by her husband
his hand is on the brake lever
Last edited:
RockZooky
New Member
Yes the running lights are 1 center row and when the brakes are applied the whole thing lights up, then the blinkers are just a different set of orange lights inside the same area flashing around the red lights
also her brake lights appear to be activated by her husband
his hand is on the brake lever
The Pic on the left is just running lights on both bikes and the pic on the right is brakes on both bikes. And easy with the "husband" talk just BF lol
joloy133
New Member
I noticed when we went riding with Arcflash that he only had the one center row lit up, and you couldn't hardly see it in the daylight. The one Tabitha has is lit up quite a bit more.
I followed Arc.... quite a bit that day and they were not very bright. They got really hard to see when you guys went to hyperdrive on the downhill twisters......Ha Ha!!
The Pic on the left is just running lights on both bikes and the pic on the right is brakes on both bikes. And easy with the "husband" talk just BF lol
Aww and you guys got matching bikes and whatnot, that's so so cute....

Hear that Tabitha? JUST BF... lol:justkidding:
arcflash316
New Member
hey zooky can u explain how you wired your lights up please, I am curious to know what i did differently to make only one row of running lights happen.....
thanks. I believe my explanation is posted earlier for clarity
and sorry for assuming you're her husband
thanks. I believe my explanation is posted earlier for clarity
and sorry for assuming you're her husband
GoGreen09
New Member
arc - I did notice that you only had one row lit on the running lights and they weren't too visible after you left us behind If it's just wiring, and all lights are supposed to be on, I might consider the integrated light again.
If it's just wiring, and all lights are supposed to be on, I might consider the integrated light again.RockZooky
New Member
hey zooky can u explain how you wired your lights up please, I am curious to know what i did differently to make only one row of running lights happen.....
thanks. I believe my explanation is posted earlier for clarity
and sorry for assuming you're her husband
I actually used your earlier write up as a guide when I did mine so they should be wired up the same. The only thing I did differently is I didn’t retain the stock bulb socket. I wonder if it is the light itself.
Tabitha
New Member
Aww and you guys got matching bikes and whatnot, that's so so cute....
Hear that Tabitha? JUST BF... lol:justkidding:
Haha, yeah, I caught that. What a jerk, huh?! j/k I'm not ready for a husband yet anyway :thumbup:
pyrocpu
New Member
Props to the folks who did this taillamp (and found it on eBay!)! I went ahead and did it myself. I do like the taillamp, although I must admit my purchase experience through the recommended vendor was middling at best. The first taillamp arrived cracked... basically took 3 weeks from start to finish. Wiring this, LED license plate bolt/lights, and mounting the fender eliminator took quite a long time--about 6 hours, from start to finish!
The end result looks amazing. It would have been nice, however, if the LED taillight had the proper resistors wired on the PC board--I now have that fast-flashing of the turn signals. I'd put some in-line resistors in, if I wasn't so dang tired of doing the wiring job!!
The end result looks amazing. It would have been nice, however, if the LED taillight had the proper resistors wired on the PC board--I now have that fast-flashing of the turn signals. I'd put some in-line resistors in, if I wasn't so dang tired of doing the wiring job!!
- Thread starter
- #35
cbzdel
New Member
Props to the folks who did this taillamp (and found it on eBay!)! I went ahead and did it myself. I do like the taillamp, although I must admit my purchase experience through the recommended vendor was middling at best. The first taillamp arrived cracked... basically took 3 weeks from start to finish. Wiring this, LED license plate bolt/lights, and mounting the fender eliminator took quite a long time--about 6 hours, from start to finish!
The end result looks amazing. It would have been nice, however, if the LED taillight had the proper resistors wired on the PC board--I now have that fast-flashing of the turn signals. I'd put some in-line resistors in, if I wasn't so dang tired of doing the wiring job!!
FYI those in line resisters get HOT if you are stuck at a light for a long time. I had them on my Mazda3 with LED blinkers. I mounted the resisters on the inside on the 1/4 pannel and the easiest place to stick it was on the inside face of the plastic bumper. Long story short after about a week the paint was bubbling in those areas!
pyrocpu
New Member
Whoa! Bubbling paint! The last time I had something like that was cracking paint--I had stuck a turbo kit on my Civic about a decade ago. Turbo + sustained canyon runs = cracked paint on hood. Small, no one else could see, but I knew, and that's enough for me.
Thanks for that heads-up; I'll just stick with fast flashies then I guess...
Thanks for that heads-up; I'll just stick with fast flashies then I guess...
Kaber3s
New Member
Good find on this tail light guys. As soon as I saw it I HAD to get it. lol
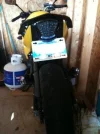
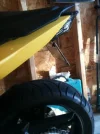
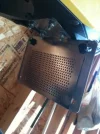
Anyways, I did all the work about 4 months ago as a winter project and I only got around to taking some pics of it today. I did it the same way as cbzdel by soldering it directly to the original bulb so that I wouldn't have to deal with any sealing issues. I also made myself a poor-man's FE out of an old pc power supply that I cut down and bent to the desired angles. All in all I think it turned out damn sexy. I also have to go back into the bike to install my new license plate tag light bolts and reattach my battery so if anyone wants me to take some more pics of the rear end disassembled I can easy do a pictorial. So without further a due, here are the results:
Anyways, I did all the work about 4 months ago as a winter project and I only got around to taking some pics of it today. I did it the same way as cbzdel by soldering it directly to the original bulb so that I wouldn't have to deal with any sealing issues. I also made myself a poor-man's FE out of an old pc power supply that I cut down and bent to the desired angles. All in all I think it turned out damn sexy. I also have to go back into the bike to install my new license plate tag light bolts and reattach my battery so if anyone wants me to take some more pics of the rear end disassembled I can easy do a pictorial. So without further a due, here are the results:
Attachments
Tabitha
New Member
Yeah, our first bike took us about 2 1/2 hours to do and then when we did mine (I was smart and let us work on his bike first ) it only took about 40 mins or so. We haven't had a nice day to take them out since we installed the tail lights. It's suppose to hit 50 here on Saturday. Sooooooo hopefully, Mother Nature will be nice and let us have our first riding day of the year so we can actually get to see our new tail lights in action!!!
) it only took about 40 mins or so. We haven't had a nice day to take them out since we installed the tail lights. It's suppose to hit 50 here on Saturday. Sooooooo hopefully, Mother Nature will be nice and let us have our first riding day of the year so we can actually get to see our new tail lights in action!!!pyrocpu
New Member
Looks great! I, too, wanted to make my own FE since it is as you say, a piece of bent metal, really. I looked around my garage and the only spare materials I had were:
Darn. Foiled again! Had to spill $40 for my FE. Yours looks great!
- A couple of 2x4s
- My dog's old plastic kennel
- Drywall
Darn. Foiled again! Had to spill $40 for my FE. Yours looks great!
Good find on this tail light guys. As soon as I saw it I HAD to get it. lol
Anyways, I did all the work about 4 months ago as a winter project and I only got around to taking some pics of it today. I did it the same way as cbzdel by soldering it directly to the original bulb so that I wouldn't have to deal with any sealing issues. I also made myself a poor-man's FE out of an old pc power supply that I cut down and bent to the desired angles. All in all I think it turned out damn sexy. I also have to go back into the bike to install my new license plate tag light bolts and reattach my battery so if anyone wants me to take some more pics of the rear end disassembled I can easy do a pictorial. So without further a due, here are the results:
Kaber3s
New Member
Thanks man. I knew there was a reason I kept boxes full of old electronics in the basement. lol
Similar threads
- Replies
- 1
- Views
- 1K
- Replies
- 1
- Views
- 772