Roaring Toyz '09-'10 Yamaha FZ6R Kickstand Install

For this task, you need the following tools:
- 14 mm socket
- 17 mm wrench
- small box end wrench or something with a hook to pull the spring
- grease
- torque wrench
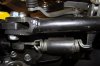
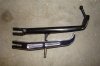
This picture is looking up from the ground where you can see the single bolt and the spring that needs to be removed.
Using a hooked tool or a small box-end wrench, hook the spring ends at the kickstand while the stand is in the up position. Pull backwards and release the spring from the post. Carefully move forward with the tool until the spring is relieved of all tension. Allow the spring to hang freely.
Using the 17 mm wrench for the nut and the 14 mm socket for the bolt, loosen the nut and remove the assembly.
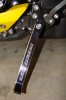
This photo is to show the difference in the sizes of the stands. While the stock stand does still work after the lowering mod, if you were to park the bike with the stock stand on an uphill incline, it is very unstable. It is recommended that should you not get the Roaring Toyz kickstand, you should always park with the stock kickstand on a level surface or on the downhill side of the bike.
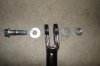
Remove and lubricate the small bushing inside the bolt hole. Lube the outside circumference liberally with axle grease. Replace the bushing.
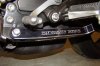
Place the larger washer over the bushing and hole and slide the new kickstand into place. This will be a tight fit. If needed, use a small flat screwdriver to carefully slide the washer into position. Place the bolt through the hole, place the smaller washer on the back of the bolt and then the nut. Tighten and torque to 40 ft lbs.
Place your hooked tool or small box-end wrench on the ends of the spring and while holding the kickstand up, pull the spring back and over the new kickstand post. Be sure that both spring ends are locked into the groove provided.
Congrats! Enjoy the riding!
Attachments
-
 92.9 KB Views: 1,391
 -
 91.2 KB Views: 1,373
 -
 94.3 KB Views: 1,349
 -
 93.6 KB Views: 1,364
 -
 91 KB Views: 3,565
 -
 92 KB Views: 1,375
Last edited: