FZ6R Decal on seat cowl


Spunky99

New Member
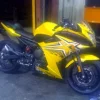
Printed onto waterslide decal material with an inkjet printer, one coat of nitrocellulose clear laquer to seal and applied.
 
Last edited:

Diluted

Super *********
Elite Member

Spunky99

New Member
Neat idea, it stands out a bit too much for me. What if you had done it in white? Would your UV LED's have lit it up? Perhaps even a lighter or darker shade of yellow than the bike for a more subtle look?
There are a million and one ways to do this. Each to his own.

The neat thing is that within 30 minutes I can have whatever I want applied to the bike. But the inkjet colors are not metallic or perfectly matched to the bike and that is the limitation.
 

Diluted

Super *********
Elite Member

DocFZ

New Member
That is pretty cool. What about doing the re-stickable vinyl cling things? Didn't really thing about the whole metallic thing with ink..
I had a post up yesterday about vinyl graphics. I'm still experimenting with different kinds of material. I think this method of graphics is pretty sweet. Never heard of it before.
 

Diluted

Super *********
Elite Member

Insure Gal

New Member
I see the decal on the tail fairing, but I don't see your seat cowl :confused:

Do you have the black seat cowl or the yellow one?

In any case it looks realy good on the tail fairing!
 

Spunky99

New Member
I had a post up yesterday about vinyl graphics. I'm still experimenting with different kinds of material. I think this method of graphics is pretty sweet. Never heard of it before.
This is the oldest method of graphics I know of. We used to put these on the plastic model cars that we used to build when there was tolulene in the plastic glue. When you bought a kit, it came with lots of decals and you could put different ones on and place them anywhere you want.

Tonight I'll make a smaller one. The one on the bike now is pretty 'BOLD" to put it mildly. I'll even see if I can find the correct font too.

DocFZ...do you know what font name is the correct one for the logo?

I've never done a decal this large before. I usually make them for the guitars I build to put on the headstocks, logo and model and serial number. This one was harder to get applied and get out the air bubbles etc.

Diluted...Do you have a source for the vinyl cling material for inkjet printers?

Since the ink is water soluble on an inkjet, I usually spray 2 thin coats of clear laquer to seal it. One thick one and the ink runs a bit. This one got a single spray so I could see how it worked and get some feedback.

Once I have the design correct, I can put 2 very thin coats of clear over the top and it will last a long time and be nice and shiny.
 

Diluted

Super *********
Elite Member

jotapeh

New Member
This is an awesome idea.. I definitely want to try something custom on my bike...

For what you've got there, if you're looking to get closer to the original "FZ6R" logo font on the bike. It's likely bold italic, with the kerning/tracking brought down a bunch so that the letters are tight but not touching.

Not sure about the font. It has 'pips' on the corners of letters and the top of the '6' goes straight up, not over to the right. Will likely take a lot of tweaking to get it to look just right, the font is definitely something custom.

But anyway, if you can fake the 'pips', Arial-Black (faux italic) with some -tracking works okay. Example attached (just started on the 'F' and 'Z'). The letter 'R' is going to look really different though, and the '6' will be kinda tough too
 

Attachments

Last edited:

jotapeh

New Member
Actually.. Disregard my last post.. it's probably a lot better to just pop open an image of the logo and trace it with illustrator/photoshop as vector art :p

I'm happy to do this if someone wants it.
 

Spunky99

New Member
Actually.. Disregard my last post.. it's probably a lot better to just pop open an image of the logo and trace it with illustrator/photoshop as vector art :p

I'm happy to do this if someone wants it.
I would love to have you do this. My hands are old and shaky...
 

DocFZ

New Member
This is the oldest method of graphics I know of. We used to put these on the plastic model cars that we used to build when there was tolulene in the plastic glue. When you bought a kit, it came with lots of decals and you could put different ones on and place them anywhere you want.

Tonight I'll make a smaller one. The one on the bike now is pretty 'BOLD" to put it mildly. I'll even see if I can find the correct font too.

DocFZ...do you know what font name is the correct one for the logo?

I've never done a decal this large before. I usually make them for the guitars I build to put on the headstocks, logo and model and serial number. This one was harder to get applied and get out the air bubbles etc.

Diluted...Do you have a source for the vinyl cling material for inkjet printers?

Since the ink is water soluble on an inkjet, I usually spray 2 thin coats of clear laquer to seal it. One thick one and the ink runs a bit. This one got a single spray so I could see how it worked and get some feedback.

Once I have the design correct, I can put 2 very thin coats of clear over the top and it will last a long time and be nice and shiny.
Ive searched up an down for a font thats close, and have come up short. I just took the picture and had to outline the logo and turn it into an .svg graphic so it would work on my program.


http://www.600cc.org/forum/f89/fz6r-vinyl-decals-19647/
 

Spunky99

New Member
There are some drawbacks and good things to the inkjet printer method of decal creation.

Negative
1. White lettering on clear background is not possible with CMYK colors.
In fact there is no way to add white outlines, stripes or anything white.

2. The metallic inks are very expensive if you want metallic.

3. The ink is water soluble so you have to put 2 very thin coats of clear lacquer over it to seal it. If you spray too much lacquer you will get ink spread in a pale pink so be careful. A second coat of lacquer softens and goes into the first coat so spray lightly as the pink run will come out.

4. Leaving your bike out in the rain may have negative effects on the decals.
Put a good coat of carnuba wax on the area and the decal to help seal it but be careful when rubbing the decal so as not to rub off the lacquer or ink.

Positive

1. Anyone with a color inkjet or laser printer can make a decal. You can use any font, graphic or image you want.

2. It takes about 30 minutes on a warm day to print and apply a finished and sealed large decal.

3. It is pretty easy to remove a decal with fingernails and water.

4. Decal paper is about $1.00 per sheet if you buy them in qty of 20 or more.

5. You can print draft mock ups with plain paper before you make the decal.

6. They can be shiny with gloss lacquer or semi gloss or matte depending on what lacquer you use to seal the decal.

7. Repositioning a decal is easy for the first 20 minutes when applying.

And the best reason to use decals is.....CHEAP.....CHEAP....CHEAP.....
 

M76

New Member
I just bought the stock gold FZ6R decals off of the 2010 (both the YAMAHA one and the FZ6R ones). My bike's a 2009; I'm replacing the stock red stickers with the gold ones and adding 6mm gold striping to the wheels.

Right now I'm debating putting the FZ6R decal either in the stock position or on the rear seat cowl... Not sure where it'll end up, but I'll post pics once I get them installed (should be here by next weekend).
 

Mikester88

New Member
Looks like ur into customizing. Trust me on this one man I did it. Cut bout 3 to 4 inches off windscreen, remove mirrors, and loosen handles to turn them inward in a more aggressive looking way. Only untill it won't hit gas tank. I'll try to post mine but idk if I can from phone


Top