
Final Impact
Member
If your bike has vibrations in the seat, handle bars and foot pegs, read on as this procedure "may" help reduce some of those vibrations.
WHAT IS THE CAUSE?:
The the spark plug cap (SPC) threads into the high tension lead (HTL) from the ignition coil. Inside the cap is coarse screw which secures the wire in the cap using a conventional clockwise thread. As the wire ages, the insulation stretches and multi-strand copper core wire may not be making the best connection. This poor connection results in added vibrations across all RPMs. It IS NOT likely responsible for a misfire, just a vibration.
HOW DO I CHECK IT & CORRECT IT:
FAN OUT WIRES LIKE THIS:

SPC INSTALLATION INTO VALVE COVER:
Components internal to Spark Plug Cap (SPC):
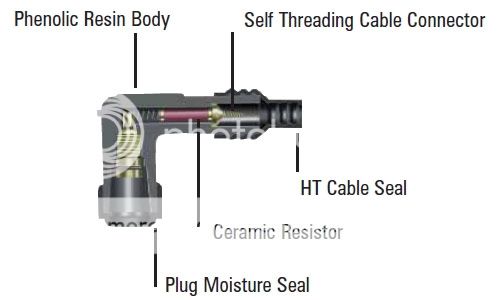
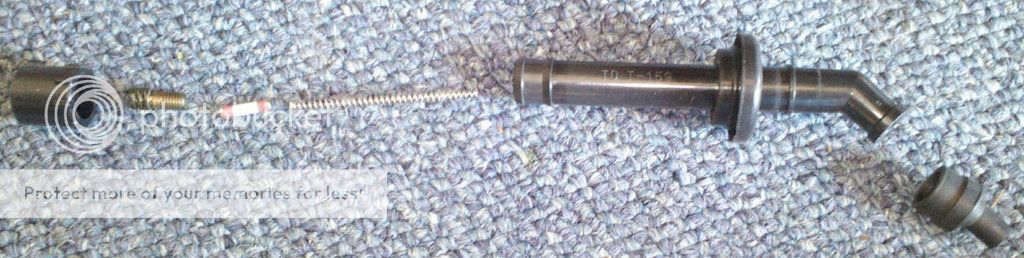
Actual components internal to cap:
Note: use a flat head screw driver to remove the brass insert.
Picture complements of Motojoe! :thumbup:
ADDITIONAL TESTING:
The SPC is composed of several parts which should be verified by testing and visual inspection during spark plug replacement or if they are suspect of causing a misfire or vibration. Because these connections are subject to high voltage (15,000+ volts) bad connections can burn and arc damaging components.
With an ohm meter set to K ohms, insert the test leads into each end of the cap. It should measure 10K ohms. Internal to the cap is a resistor, spring, plug lock, and self threading cable connector. If any of these component have corrosion, arcing, or burning, they should be replaced. Also, the FSM does not list a limit. Mine all measured 10.7 ~ 10.8K ohms.
The resistor spark plugs are supposed to measure 5.0K ohms. My used CR9EK's measured ~ 4.0K ohms each.
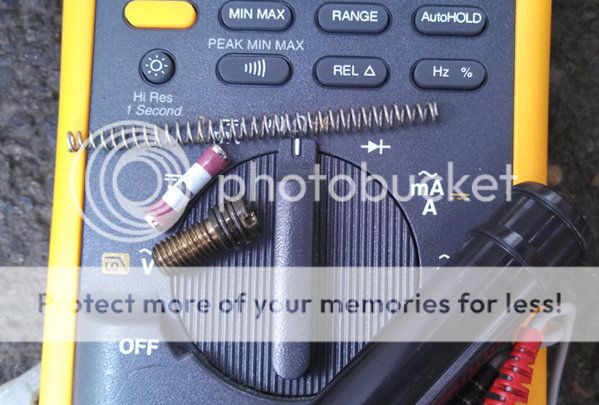
COMPONENTS:
On top of my meter you see the spring, resistor, locking insert (locks Cap to Plug), and the end of the cap body.
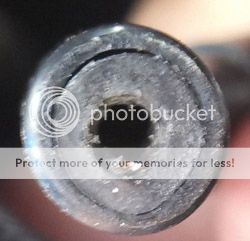
SPECULATION/ROOT CAUSE:
In this photo the wires spiral wound core was all pushed off to one side (can't see it, sorry). This cap/wire spun freely with no resistance to turning. IMO, it appears the core of the wire if not fanned out, is pushed to one side and moves away from the caps screw easier than if the strands are fanned out.
HOW WAS THIS DISCOVERED:
I found that the spark plug wire to cap had gotten loose as described here. Although it didn't create a misfire or make the bike run bad (it ran great), it did make a harmonic vibration across all RPMs which rules out throttle body sync. This vibration was increasing so I went for ONE CHANGE and that was to remove the four plug caps from the head and inspect how the high tension lead was seated to the caps. I DID NOT TOUCH ANYTHING ELSE, JUST THE SPC/s & HTS's.
That's when I found the HTL was no longer tight in the SPC. At first I thought this condition added resistance to the junction and it may very well do that. However, the spark plug and the cap assembly account for 13 to 16,000 ohms of resistance THUS IT IS VERY UNLIKELY that a copper wire against a brass screw has high resistance. i.e. more than 10 ohms total. It is MORE likely there is capacitance altering the coils saturation time (charge rate). Remember this is a waste spark system and one coil is responsible for two cylinders. The capacitance may actually alter when the spark arrives thus inducing harmonic vibrations to the firing as it out of time ever so slightly.
PS - I found that one wire being loose can cause a noticeable vibration!! In the last event, cap #4 (spun freely w/out resistance). Last time it was #2 about 2000 miles ago.
SPARK PLUGS:
Check the gap on your plugs and do not Exceed the Recommended gap. If using conventional carbon plugs (CR9EK side fire or CR9E End Fire) the gap should be set to less than the maximum as it opens as it wears.
Spec: 0.024–0.028 in (0.6–0.7 mm). Set to Max for Iridium plugs.
DOES NOT FIX: vibrations induced by poor drive chain maintenance, worn sprockets, or kinky chains.
It is recommended to perform this when changing spark plugs and before performing a Throttle Body Sync.
PS - Thanks for letting us borrow Marthy once in a while!
Hey, I'm on the FZ6 sister forum and we found an issue which could help some of you with vibrations. However, our bikes are a bit older so this may not be an issue OR design changes may have mitigated it to a none-issue after 2008 as Yamaha changed the PN in 2009 from FZ6 = 5VX-82370-00-00 to 2009 FZ6/FZ6R, 20S-82370-01-00, PLUG CAP ASSY). A search didn't find anything so I'm going to paste it here and if it helps someone, great! From: Vibration! A cure for bad vibrations, Spark Plug Caps!! - Yamaha FZ6 Forums - International FZ6 Motorcycle Community Forum
NOTE: ** SPEC's LISTED ARE SPECIFIC TO FZ6 **WHAT IS THE CAUSE?:
The the spark plug cap (SPC) threads into the high tension lead (HTL) from the ignition coil. Inside the cap is coarse screw which secures the wire in the cap using a conventional clockwise thread. As the wire ages, the insulation stretches and multi-strand copper core wire may not be making the best connection. This poor connection results in added vibrations across all RPMs. It IS NOT likely responsible for a misfire, just a vibration.
HOW DO I CHECK IT & CORRECT IT:
- Remove the two bolts holding the radiator and lower the radiator being careful not to damage it.
- From the right side of the engine, lift up and remove spark plug cap #4 (Far right). DO NOT PULL ON THE WIRE!
- Hold the HTL and gently rotate the SPC clockwise. With very minimal tension applied, the cap should turn maybe a half turn on the wire and be snug resiting turning. If it snugs up and resists turning, leave it alone and more on to the next one.
- If the cap spins freely on the wire with no resistance to rotation, unscrew it by rotating the SPC counter clockwise. Using a pair of sharp side cutting pliers, cleanly cut off 1/4" (6mm) from the HTL.
- Using small pick, fan out the copper wire strands into a 360 degree pattern. Do not bend them repeatedly.
FAN OUT WIRES LIKE THIS:
- ADDITIONAL TESTING; If you have a DMM (hand held multimeter), see section below for additional testing.
- Push the SPC onto the wire and turn it clockwise until its snug.
- Proceed to next cap and remove it for inspection.
SPC INSTALLATION INTO VALVE COVER:
- Starting on the left side of the engine, insert SPC #1. You should feel and hear the lock on the cap engage the spark plugs conductor. The dust seal should simultaneously seat on the valve cover. If the SPC pops back up any amount after seating it, remove the SPC and move the dust seal up the body towards the HTC.
- Seat the SPC onto the plug.
- Seat the dust seal onto the the valve cover. Confirm it seals 360 degrees.
- Proceed to next SPC to the right.
Components internal to Spark Plug Cap (SPC):
Actual components internal to cap:
Note: use a flat head screw driver to remove the brass insert.
Picture complements of Motojoe! :thumbup:
ADDITIONAL TESTING:
The SPC is composed of several parts which should be verified by testing and visual inspection during spark plug replacement or if they are suspect of causing a misfire or vibration. Because these connections are subject to high voltage (15,000+ volts) bad connections can burn and arc damaging components.
With an ohm meter set to K ohms, insert the test leads into each end of the cap. It should measure 10K ohms. Internal to the cap is a resistor, spring, plug lock, and self threading cable connector. If any of these component have corrosion, arcing, or burning, they should be replaced. Also, the FSM does not list a limit. Mine all measured 10.7 ~ 10.8K ohms.
The resistor spark plugs are supposed to measure 5.0K ohms. My used CR9EK's measured ~ 4.0K ohms each.
COMPONENTS:
On top of my meter you see the spring, resistor, locking insert (locks Cap to Plug), and the end of the cap body.
SPECULATION/ROOT CAUSE:
In this photo the wires spiral wound core was all pushed off to one side (can't see it, sorry). This cap/wire spun freely with no resistance to turning. IMO, it appears the core of the wire if not fanned out, is pushed to one side and moves away from the caps screw easier than if the strands are fanned out.
HOW WAS THIS DISCOVERED:
I found that the spark plug wire to cap had gotten loose as described here. Although it didn't create a misfire or make the bike run bad (it ran great), it did make a harmonic vibration across all RPMs which rules out throttle body sync. This vibration was increasing so I went for ONE CHANGE and that was to remove the four plug caps from the head and inspect how the high tension lead was seated to the caps. I DID NOT TOUCH ANYTHING ELSE, JUST THE SPC/s & HTS's.
That's when I found the HTL was no longer tight in the SPC. At first I thought this condition added resistance to the junction and it may very well do that. However, the spark plug and the cap assembly account for 13 to 16,000 ohms of resistance THUS IT IS VERY UNLIKELY that a copper wire against a brass screw has high resistance. i.e. more than 10 ohms total. It is MORE likely there is capacitance altering the coils saturation time (charge rate). Remember this is a waste spark system and one coil is responsible for two cylinders. The capacitance may actually alter when the spark arrives thus inducing harmonic vibrations to the firing as it out of time ever so slightly.
PS - I found that one wire being loose can cause a noticeable vibration!! In the last event, cap #4 (spun freely w/out resistance). Last time it was #2 about 2000 miles ago.
SPARK PLUGS:
Check the gap on your plugs and do not Exceed the Recommended gap. If using conventional carbon plugs (CR9EK side fire or CR9E End Fire) the gap should be set to less than the maximum as it opens as it wears.
Spec: 0.024–0.028 in (0.6–0.7 mm). Set to Max for Iridium plugs.
DOES NOT FIX: vibrations induced by poor drive chain maintenance, worn sprockets, or kinky chains.
It is recommended to perform this when changing spark plugs and before performing a Throttle Body Sync.
PS - Thanks for letting us borrow Marthy once in a while!