Roaring Toyz Lowering Link Install


FZ1inNH

Super Moderator
Roaring Toyz
2009-2010 Yamaha FZ6R
Lowering Link Install


These instructions are an overview of installing the lowering link for your Yamaha FZ6R. This is best performed with 1/4 tank or less of fuel.

Tools required for this job:
• 6 and 8 mm Allen wrenches
• 3/8" Allen wrench
• 10 and 17 mm wrenches
• 3/4" wrench
• Hoist or motorcycle jack
• An assistant for this is helpful!
Begin by removing the seats. Your key removes the rear or pillion seat. Once removed, there are two 6 mm Allen head bolts to remove the front seat as shown here:


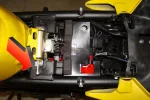
Remove the seat pan below the by removing the two 10 mm bolts on each side shown here:


Remove the fuel tank as follows: First, remove the rear tank bolt (6 mm).


Remove the two 6 mm front Allen screws:


For these steps, you will need to either prop the tank up with a 12 - 14" wooden stick or have someone assist by holding the tank.
1. Lift the tank slightly in the front and lift the back off the mount.
2. Slide the tank backwards until it clears the inner fairings.
3. Lift the front of the tank several inches and place the rear of the tank back on the mount.
4. Prop or have an assistant hold the tank upright to the point you can easily work with the connections.
5. Squeeze the two small spring clamps and slide them down the vent and overflow tubing then disconnect the tubes.
6. Press the releases on the two electrical connections and disconnect both. NOTE: The green goes on the rear and the white plug on the front of the fuel pump.
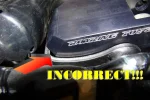
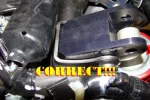
7. Place some rags beneath the fuel line on top of the bike.
8. Remove the black fuel line clip, press the two gray buttons on either side of the fuel line clamp and release the fuel line from the bike. You will have a small amount of fuel released but it will be minor.
9. Remove the tank and set it aside laying flat.


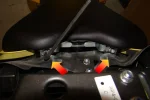
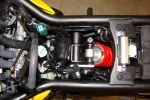
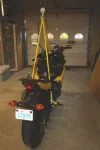
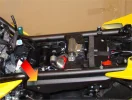
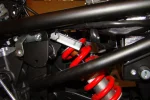
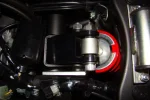
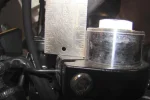
You can now see the top of the shock where the link will be installed. At this time, you will need to either hoist or lift the bike to relieve the weight from the rear tire, swing arm and shock.


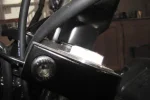
Remove the side panel shown below with the 6 mm allen wrench. The cover is further held in place by two rubber clip mounts. Lift up and pull forward and outward at the same time to remove the cover. This exposes the area needed to bolt the link in place.


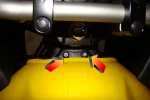
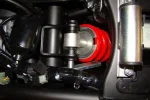
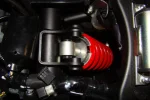
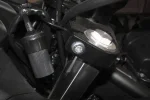
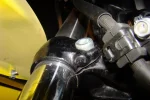
Remove the bolt from the top shock mount using the 17 mm wrench to loosen the nut. Slide the bolt out to the left side of the bike. Make sure you hold on to the retaining bar so it does not fall into the bike. You may have to use the hoist, jack or your assistant to raise/lower the swing arm to wiggle the bolt free.


Attachments

Last edited:

FZ1inNH

Super Moderator
Install continued....


Lift the bike using the jack or hoist until the rear wheel is off the ground. This allows you the space needed to place the link and bolt on the shock. Holding the front of the link, align the link holes with the shock and insert the bolt from the left side of the bike.

With the bolt in place, slowly lower the bike until you can tilt the link into the stock shock mount.

Be sure the link is seated like this and NOT like the second picture below!!!


Once the link is in place as shown in the first picture, raise the bike until the link is aligned and insert the stock shock bolt through the retaining bar first then the mount and link.


Place the washer and nut on the mount and link bolt and tighten loosely using the 17 mm wrench.
Place the 3/4" nut and washer from Roaring Toyz on the shock bolt and tighten loosely with a 3/4" wrench and a 3/8" Allen wrench.
Torque both to 40 ft lbs.
Reinstall the fuel tank in the reverse order that it was removed above. Be careful not to crimp any of the hoses when setting the tank back into place. Again, be sure the white electrical plug is on the front of the fuel pump and the green is on the rear.
Reinstall the side cover, seat height pan, front seat then rear seat. Your lowering link install is complete.


Front Forks:
To lower the front of the bike accordingly, you will need to keep the bike on the lift or hoist. Lift the bike until the front suspension is no longer compressed. There are four allen bolts that clamp the forks into the upper and lower triples. The top on each side pictured here:


And the lower, as seen looking up under the front fairing:


Loosen the two top bolts, then the two lower bolts. Lower the bike slowly to compress the forks. If they do not slide up out of the top triple on their own, you may need to have an assistant steady the bike while you hold the front brake and push down on the handlebars. Pay close attention to the fork tubes and how much is showing above the top triple. At the stock setting, these are flush with the top triple:


Carefully measure BOTH sides until you have 3/4" of fork tube showing above the top triple as shown here:


Tighten the lower triple clamping bolts first until they are snug and then using the allen wrench, turn them one quarter turn to tight. Do this for both lower bolts. Go back and measure each fork tube once again to insure they are identical in height. Once your measurements are verified, torque the lower bolts to 25 ft lbs. Torque the upper clamp bolts to 20 ft lbs.

Congratulations! Enjoy the ride!
 

Attachments

Last edited:

elderproctor

New Member
lowering front

hi, we are trying to see if we did our front correct or incorrect. Roaring Toyz website suggest lowering the front 1.75.


Roaring Toyz
When lowering any bike we suggest lowering the front and rear of the bike an even amount. On the Yamaha FZ6R we suggest sliding the forks up in the trees 1.75". When lowered evenly the bike will require the kickstand to be shorter. For this we developed a High Quality Billet Machined Lowering Kickstand to pair with our link. This kickstand will not only allow the bike to sit right but also is very attractive.

My husband thought that 1.75 was a little to low, so that is why we are asking
 

FZ1inNH

Super Moderator
hi, we are trying to see if we did our front correct or incorrect. Roaring Toyz website suggest lowering the front 1.75.


Roaring Toyz
When lowering any bike we suggest lowering the front and rear of the bike an even amount. On the Yamaha FZ6R we suggest sliding the forks up in the trees 1.75". When lowered evenly the bike will require the kickstand to be shorter. For this we developed a High Quality Billet Machined Lowering Kickstand to pair with our link. This kickstand will not only allow the bike to sit right but also is very attractive.

My husband thought that 1.75 was a little to low, so that is why we are asking
We also thought it was too low as well. I went by what xplodnstar had posted which was about half of what the link lowered. While 1.75" is doable, I feel it is a bit aggressive. I'm suggesting 3/4" and then lower in 1/4" increments to suit your riding style.

If the front of the bike is high, the bike will want to go wide on corners, meaning you have to lean and push down on the bar harder.

If the front of the bike is too low, it will corner very aggressively but not handle well in a straight line and could result in a tank-slapper which is bad.

This is a good starting point and it's easy enough to re-adjust as necessary. He did nothing wrong to your bike but if you find it unstable on straight runs, have him decrease the amount of fork showing by 1/4" increments until you are comfortable in corners and straights. :D
 

FZ1inNH

Super Moderator
As a result of this mod, my wife is now able to 100% flat-foot the bike. She was grinning ear to ear with her newfound confidence in being able to maneuver the bike such as backing it out of the garage or backing up to turn it around.

She is 5' 2" with a 30" inseam and wears motorcycle boots that lift her an inch.

Since she isn't too agressive in the corners, I may take it out and try some cornering with it. If I find it doesn't fall into the corners easily, I'll be adjusting her forks accordingly.
 

rubicon1000

New Member
In the pic your correct way to install the link do u have the link sticking down in the pocket or does it sit on the link
 

FZ1inNH

Super Moderator
In the pic your correct way to install the link do u have the link sticking down in the pocket or does it sit on the link
The link in the picture labeled CORRECT has the link sitting in, not on top of, the shock mount pocket. If it is sitting on top of the pocket, it is not installed correctly. Hope that helps! :D
 

FZ1inNH

Super Moderator
BTW, once approved by the guys at Roaring Toyz, I will have this document in Word format in the event anyone wants it who has purchased the link. I will likely attach to the OP for download.
 

FZ1inNH

Super Moderator
Wow I think by moving it down in the pocket she will gain like 1/4 or 1/2 inch cause it's sitting flush on top now
Best to do this regardless because it's able to move in the position you have it in now which could be dangerous on a hard corner. :eek: ;) And yes, she will gain at least 1/2" lower to he ground.

Please do this for her before she rides again?
 

NYGirl

New Member
Big thanks

THANK YOU for posting these most EXCELLENT photos, making it very easy to follow and understand how this lowering link is to be installed!
SUPER JOB!!:thumbup:
 

FZ1inNH

Super Moderator
THANK YOU for posting these most EXCELLENT photos, making it very easy to follow and understand how this lowering link is to be installed!
SUPER JOB!!:thumbup:
If I missed anything or you have questions, please do ask here or in a PM. :D Thanks for the kudos!
 

xplodnstar

New Member
You did an AWESOME job on the write up. If I hadn't already muddled through it myself (+ hubby), this would have been a BIG help. Your pictures are concise and easy to understand, and your instructions and explanations are perfect.

BTW, I noticed 3 Costco sized litter pails in your garage pics, how many cats do you have? :)

Oh, and thanks for the props earlier, I'm glad I could help. As a note, I have found the riding position with the 3/4" front drop to be very comfortable and it feels smoother and more stable in turns (to me).
 

FZ1inNH

Super Moderator
You did an AWESOME job on the write up. If I hadn't already muddled through it myself (+ hubby), this would have been a BIG help. Your pictures are concise and easy to understand, and your instructions and explanations are perfect.
Thanks! I was glad to do it and hope that it helps someone out there. Initial response from Roaring Toyz was really good. :D

xplodnstar said:
BTW, I noticed 3 Costco sized litter pails in your garage pics, how many cats do you have? :)
We have a ZOO here at home. :D Ready for this?
  • One dog
  • three cats
  • four ferrets
  • two frogs
  • 4 fish
  • and (soon) one parrot (Only animal that is mine!)

xplodnstar said:
Oh, and thanks for the props earlier, I'm glad I could help. As a note, I have found the riding position with the 3/4" front drop to be very comfortable and it feels smoother and more stable in turns (to me).
That is excellent news! Michele has yet to complain about it so I'm guessing she is really happy with the outcome. I also put on a set of SW-Motech 1" bar risers for her too which helped her reach and made her sit a bit more upright. I really think, that with a more comfortable seat, she'd be 100% happy with it.
 

xplodnstar

New Member
That is excellent news! Michele has yet to complain about it so I'm guessing she is really happy with the outcome. I also put on a set of SW-Motech 1" bar risers for her too which helped her reach and made her sit a bit more upright. I really think, that with a more comfortable seat, she'd be 100% happy with it.
I've had a thought about that, depending on which part is uncomfortable. For the cushion, I thought I could get some gel inserts, like for shoes, and put them in under the shell to add some squish.

I haven't needed it since I got the Corbin, but does anyone think it might work?
 

FZ1inNH

Super Moderator
I've had a thought about that, depending on which part is uncomfortable. For the cushion, I thought I could get some gel inserts, like for shoes, and put them in under the shell to add some squish.

I haven't needed it since I got the Corbin, but does anyone think it might work?
I had a gel seat on the FZ6 once. It didn't last long. :(

When it got hot, it stayed VERY hot. When it got cold, it was hard as a rock and stayed cold.

Better plan would be to remove "some" stock foam and replace with twice the thickness in memory foam. :D
 

treynewton1

New Member
Got my girls bike lowered and I must say it made a big difference for her. She can flat foot it now and feels alot more confident and comfortable
 

fzbrooke

New Member
Has anyone had any negative experience with the Roaring Toyz lowering kit, or lowering in general. I am considering it with my days old FZ6R but have heard bad things about lowering with links and with sliding the forks up the triple tree.
Thanks!
Brooke
 

xplodnstar

New Member
I LOVE the lowing link. It has made my ride less stressful for me. Knowing that when I have to come to a stop I will be able to actually touch both feet to the ground is a GREAT feeling.

I actually like the ride better with the bike lowered.
 

FZ1inNH

Super Moderator
Nothing negative from my wife about it. Same as xpoldnstar's experience, all positive and she is much more confident on the bike now. It's a simple but very effective product!
 
Last edited:


Top