Rear fender Led Brake Light


Ricenoodle

New Member
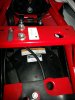
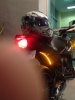
I wanted to add more visibility and alter the bike to be more me so i went this this mod, hope this helps any of you guys who are considering it, super simple to do. I took my time as always because once a mod is done i am left with a sense of emptiness until the next one :D I tried taking alot of pics as i go along to ease any confusion and simplify things.
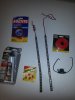
Parts:
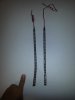
2 Red 72 leds strip- $14 - New 2X Red 30cm 72LEDS 3528 SMD Double Lines Car LED Strip Light Bright R72 | eBay
Black RTV Silicone- $5 (O'reily's)
Loctite 100 lb outdoor mounting tape- $8 (Walmart)
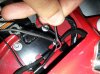
Fuse Holder- $6 (Walmart)
Extra wire- $5 (i ended up not needing it)
Heat Shrink- $5 (ebay)
9v battery for testing.


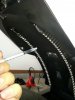
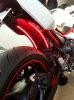
1. The leds arrived with some cheap 3m tape on it, i scraped it off and put the Loctite tape on there. Tip: put the strip on one edge of the tape, that way you only have to trim one side.
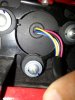
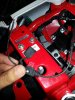
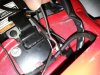
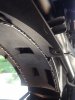
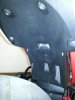
2. If you look up under the fender you will see 2 dimples in the plastic, that is where we'll route our wires through. I cleaned with soap and water first, then isopropol alcohol i had around the house for cuts and scrapes.
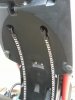
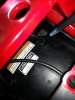
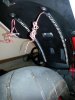
3. installed the leds where i wanted them, take your time here, this tape is SOLID so gauge everything well before pressing in.
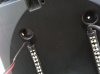
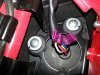
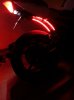
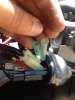
4. Next i heatshrink the ends of the leds where it will feed into the bike to ensure a waterproof seal.
 

Attachments

Last edited:

Ricenoodle

New Member
5. Here's the view of the 2 dimples that we saw from underneath, i decided to drill closest to the tank so the wire can have a edge to be resting on once i sealed it.
6. Here's the view from underneath, i used a 1/8" drill bit so it'll be a tight fit with the heat shrink feeding through it, once done, feed the wires through.
7. I have a motodynamic integrated taillight so i decided to tap into there for functionality, i used T-taps for easiness but a solder gun will definately work if that's your thing. Wires are labeled as follows: Black=Ground, Red=Park, White=Brake, Yellow=Right Signal, Blue=Left Signal.
 

Attachments

Last edited:

Ricenoodle

New Member
8. I RTV'd the edges of the leds and the holes from inside the bike to a. ensure no water gets in and make the mounting loose b. add another way to hold the leds strip up, hate for these to come off at high speeds. Curing time is 24 hours.
9. So the led have a red for positive, black for negative, i took the 2 positives wires from the leds and heatshrink those together, did the same for the negatives. I then hooked up a 10 amp fuse to the fuse holder and attached that to the positive end in the event of a spike or a short it won't ruin the whole electrical system.
 

Attachments

Ricenoodle

New Member
Last step is to connect the Positive end (inline fuse) to the White for brakes, and Negative end to black for ground. Tuck the wires back in and voila you're done. Leds will remain off until brakes are engaged. You can also hook up each individual led to either the left or right blinker wires using the description above as another means of flushed signals since these are quite bright. Remove the integrated taillight to give you more room to work. Overall i'm super happy with this mod, took me about 2 hours since i took my time. Hope you guys enjoyed the tutorial. Chris
 

Attachments

Last edited:

lwclancers

New Member
This is brilliant. Ive been thinking about doing something similar on the rear. I gotta see if this is legal in VA first, which IM fairly sure I wont get a confirmed answer anywhere I look.
 

gado

Member
Looks good! I did the same thing to my bike a while ago except with a shorter strip and more towards the center.
 

Ricenoodle

New Member
So far so good, took the bike for a spin today on the freeway today to see how the strips would hold up at high speeds. 30 minute rides with bursts up to triple digits and no problem. The Rtv on the edges definitely helped, apply a good amount and spread it with a popsicle stick for an even bead. Sitting at a red light a cop came up behind me, I was in 1st with the clutch in, I squeezed the brakes in for the duration of the 30 second light, no response from the Man :D The fact that the leds are not on all the time and only used for brakes probably helped.
 

lwclancers

New Member
I just bought the lights as well. Now I have 2 lighting mods to eventually get to
 

nismos14

I'm movin on
Elite Member

nismos14

I'm movin on
Elite Member

Ricenoodle

New Member
costwise this is a fairly cheap mod, and I've since added silicone adhesive both on the inside of the bikes and on the edges of the strips just for peace of mind. No signs of them coming loose at all but can't hurt to be too safe. I've gotten a lot of compliments since install, glad I did it since I see no bikes with it out here yet.
 

Ivan_13

New Member
I did something similar, but I used two yellow led strips, and wired them as my rear turn signals. So I pulled off the fender, put in my FE, pulled off the right panel to access all the wires. The black connection was the right signal, and the grey connection was then left signal. Does anyone know what the remaining two wires do? I'm holding them together in this picture.
 

Attachments

Ivan_13

New Member
Here's a picture of the two strips. Installation was a little sloppy, but these look killer at night.. Picture coming soon.
 

Attachments


Ivan_13

New Member
I am in love with this mod.. :):):):)
I ran out of time, but I plan to add a red led strip on each side, towards the inside of the turn signals. But I have no idea on how I would wire them to only activate when I press on the brakes. I have the stock tail light.
 

Attachments


Top