Jrodroberts
New Member
Never posted before but I've read alot and gotten alot of help from what I've learned on here so I figured I'd give back a little. First off let me say that for whatever reason, maybe because of all the bad dip jobs out there, plasti dip has some haters. People say it's not durable, it looks bad, it doesn't peel right etc.. Don't listen to them. This stuff is awesome. Customize and change the color of almost anything on your bike for just a few bucks. I spent probably $50 on the dip part of my makeover project. Once you get the hang of spraying it, it goes on smooth as butter, dries to an oem looking finish, you can do whatever kind of effects and finishes and when you're done, as long as you got about 4-5 coats on, it'll be durable and you can literally peel it off in one piece and go back to factory in minutes.
OK now that you're sold, here's what you do:
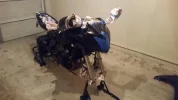
First, take any piece off your bike that you want dipped. This isn't mandatory but it'll make it easier. This will let the dip cover fully edge to edge on each piece and let you hit it from all the angles (giggity). Also you'll have to tape off any piece that you want to leave on the bike to dip, so it's just easier.
Next, give everything you're going to paint a good warsh with some soap and water, mild dish soap or something like that, don't use any hardcore automotive shiny waxy special soap, anything with wax can cause the dip to lift. I just used a little dawn and water. Then let your bike and any pieces dry completely! Overnight if possible. Any moisture could prevent the dip from adhering properly.
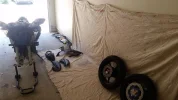
Prep the rest of your bike, tape around anything you don't want dipped. It doesn't have to be perfect except where you really want clean lines. You can throw plastic over the rest or newspaper or whatever you want. Just get all the important stuff that you don't want gunked up protected. If you don't tape every inch off and you end up with some over spray, don't sweat it, it comes off easy when you want it to.
There's some really good how to videos on the dip your car YouTube channel for wheels and cars and everything. The process is pretty much the same no matter what you're dipping. And if you get your dip from dipyourcar.com the customer service is excellent, they'll answer any questions you have about your project. You can get your dip from anywhere but their inventory is impressive and almost intimidating. Any color, any finish, any effect they have what you need. If you're just a matte black kinda person, home depot is fine.
If you're using the rattle cans make sure they're a little warm, you can put them in a bucket of warm water for a few minutes if you really need but having them in my garage in Texas worked for me. Shake the can for at least 30 seconds and give it a test spray on something. It has a fan shaped spray pattern not a circular one like a krylon can. Start from whatever edge you're dipping and about 5 inches above it and move side to side across the piece until it's covered. For your first coat it's good to do a light tacky coat as kind of a primer. Your next coats should be pretty heavy, wet coats to let the dip level out completely as one piece and avoid texture. Make them wet but not so wet that they drip, once it drips, that's it you're peeling and restarting. Wait about 15 minutes between coats, this stuff dries pretty quick. After about 4-5 coats you're done, unless you just want more on there.
It's recommended to remove your tape immediately after your final coat. This is mostly important for areas where the tape is physically touching a surface that is dipped. If you let it dry it'll take the dip right with it, if you're not careful.
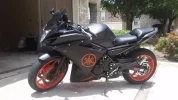
Put your bike back together, get out a wax that's compatible with plasti dip like Dip Coat. Give her a good wipe down and step back and enjoy your brand new $50 paint job. Wash it with soap and water when it's dirty, don't pressure wash it or scrub it, take care of it and it can last years! Or peel it off when you're bored and do it a different color. It does peel off but don't think it's just gonna fall off when you're riding or something, you really have to get an edge to lift and really pull at it, it's not gonna just fall off. But if you want it to peel, it will.
Some things I learned:
Buy more dip than you need, you don't wanna skimp on a part because you're running out and trying to conserve. Plus, you'll have some later if you ever need to touch up a part. I used about 4 cans black and 3 orange.
Take your time, buy a can just to practice with and do a couple practice dips on random things. This stuff isn't spray paint, if you don't spray with the nozzle pointed directly at the surface and don't follow the contours of the bike, you could get texture. That's where all those ugly dip jobs come from where it looks like someone spray painted chalkboard paint over bird crap. The actual finish can be smooth as oem. A guy told me the other day he thought my bike had a factory paint job and he couldn't believe it was dip.
That's it, just have fun with it and don't stress if you don't get it perfect right away, I ended up peeling and redipping my whole first fender and tank because I didn't get the hang of it till about halfway through. And it wasnt even a ton of extra work!
PM me if you have any questions and thanks to everyone on here who posts! Because of yall I've gone from never working on a bike before to lowering my bike, putting on Woodcrafts, fender eliminator, turn signals and a taillight and learned how to do 100 more things to my bike. She's so pretty now! They grow up so fast :')
Happy Dipping!
OK now that you're sold, here's what you do:
First, take any piece off your bike that you want dipped. This isn't mandatory but it'll make it easier. This will let the dip cover fully edge to edge on each piece and let you hit it from all the angles (giggity). Also you'll have to tape off any piece that you want to leave on the bike to dip, so it's just easier.
Next, give everything you're going to paint a good warsh with some soap and water, mild dish soap or something like that, don't use any hardcore automotive shiny waxy special soap, anything with wax can cause the dip to lift. I just used a little dawn and water. Then let your bike and any pieces dry completely! Overnight if possible. Any moisture could prevent the dip from adhering properly.
Prep the rest of your bike, tape around anything you don't want dipped. It doesn't have to be perfect except where you really want clean lines. You can throw plastic over the rest or newspaper or whatever you want. Just get all the important stuff that you don't want gunked up protected. If you don't tape every inch off and you end up with some over spray, don't sweat it, it comes off easy when you want it to.
There's some really good how to videos on the dip your car YouTube channel for wheels and cars and everything. The process is pretty much the same no matter what you're dipping. And if you get your dip from dipyourcar.com the customer service is excellent, they'll answer any questions you have about your project. You can get your dip from anywhere but their inventory is impressive and almost intimidating. Any color, any finish, any effect they have what you need. If you're just a matte black kinda person, home depot is fine.
If you're using the rattle cans make sure they're a little warm, you can put them in a bucket of warm water for a few minutes if you really need but having them in my garage in Texas worked for me. Shake the can for at least 30 seconds and give it a test spray on something. It has a fan shaped spray pattern not a circular one like a krylon can. Start from whatever edge you're dipping and about 5 inches above it and move side to side across the piece until it's covered. For your first coat it's good to do a light tacky coat as kind of a primer. Your next coats should be pretty heavy, wet coats to let the dip level out completely as one piece and avoid texture. Make them wet but not so wet that they drip, once it drips, that's it you're peeling and restarting. Wait about 15 minutes between coats, this stuff dries pretty quick. After about 4-5 coats you're done, unless you just want more on there.
It's recommended to remove your tape immediately after your final coat. This is mostly important for areas where the tape is physically touching a surface that is dipped. If you let it dry it'll take the dip right with it, if you're not careful.
Put your bike back together, get out a wax that's compatible with plasti dip like Dip Coat. Give her a good wipe down and step back and enjoy your brand new $50 paint job. Wash it with soap and water when it's dirty, don't pressure wash it or scrub it, take care of it and it can last years! Or peel it off when you're bored and do it a different color. It does peel off but don't think it's just gonna fall off when you're riding or something, you really have to get an edge to lift and really pull at it, it's not gonna just fall off. But if you want it to peel, it will.
Some things I learned:
Buy more dip than you need, you don't wanna skimp on a part because you're running out and trying to conserve. Plus, you'll have some later if you ever need to touch up a part. I used about 4 cans black and 3 orange.
Take your time, buy a can just to practice with and do a couple practice dips on random things. This stuff isn't spray paint, if you don't spray with the nozzle pointed directly at the surface and don't follow the contours of the bike, you could get texture. That's where all those ugly dip jobs come from where it looks like someone spray painted chalkboard paint over bird crap. The actual finish can be smooth as oem. A guy told me the other day he thought my bike had a factory paint job and he couldn't believe it was dip.
That's it, just have fun with it and don't stress if you don't get it perfect right away, I ended up peeling and redipping my whole first fender and tank because I didn't get the hang of it till about halfway through. And it wasnt even a ton of extra work!
PM me if you have any questions and thanks to everyone on here who posts! Because of yall I've gone from never working on a bike before to lowering my bike, putting on Woodcrafts, fender eliminator, turn signals and a taillight and learned how to do 100 more things to my bike. She's so pretty now! They grow up so fast :')
Happy Dipping!