I was going to say the sameIt's been shortly, where are the pics bro! LOL

Led Windscreen Bolts
- Thread starter Ravinx
- Start date
Ricenoodle
New Member
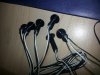
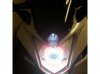
Ok so the bolts came pretty quick, 3 days to Hawaii. They are pretty solid cnc with 4 bolts having straight on led, and the other 2 have a slit cut into the side of the bolt head right underneath, supposedly you can have these shine onto the windscreen like the pic on the website in the OP but i didn't want to have 2 of my bolts half way screwed in so i screw it in all the way. These 2 will be slighty dimmer as you can see in the pics but not that noticeable. Anyway The bolts came with 2 wires each and they are pretty flimsy 26 Gauge wires, but i guess they had to in order to fit into the bolts. To prep, remove the 2 top plastic piece on top of the fairings and the piece under the dash, here's the rest of the step of what i did.
1. The bolts have hot glue underneath where the wires come out already but i put some more silicone under them where the wires come out for good measure.
2. Next i heatshrink all the wires so they are more rigid to handle and to waterproof them, leave a bit of wires exposed.
3. Remove the old screws, install new ones, fish each wire to its respective side.
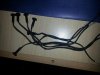
4. You're gonna end up with 6 wires on each side, next step is to combine 3 pos into one connector and do the same for the negative side. I connected a longer wire for each line. I then heat shrink each bundle separately.
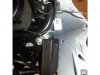
5. You'll have a set of positive and negative wires on both side at this point, ziptie them into a suitable place where it doesn't move.
6. I went with these connectors to tie the left side into the right side, and i have to say that's the easiest and strongest method i've used yet. Much better than T-taps and no need to solder and heatshrink.
7. After the Insure connectors which ties 2 positive in and leaves me with one positive out, (same for negative wire), I then tie into the running light using the same style connectors with a 10A fuse, wam bam thank you ma'am.
All in all the process took about 3 hours, longest part being i am ocd about cleanly and properly running wires. The leds are bright, best viewing angle is dead on, the pics are realistic as far as brightness and view angle. Have patience if you're going to do this project because it's not hard, just time consuming, pretty fun mod for something unique and different. Hope that helps.
1. The bolts have hot glue underneath where the wires come out already but i put some more silicone under them where the wires come out for good measure.
2. Next i heatshrink all the wires so they are more rigid to handle and to waterproof them, leave a bit of wires exposed.
3. Remove the old screws, install new ones, fish each wire to its respective side.
4. You're gonna end up with 6 wires on each side, next step is to combine 3 pos into one connector and do the same for the negative side. I connected a longer wire for each line. I then heat shrink each bundle separately.
5. You'll have a set of positive and negative wires on both side at this point, ziptie them into a suitable place where it doesn't move.
6. I went with these connectors to tie the left side into the right side, and i have to say that's the easiest and strongest method i've used yet. Much better than T-taps and no need to solder and heatshrink.
7. After the Insure connectors which ties 2 positive in and leaves me with one positive out, (same for negative wire), I then tie into the running light using the same style connectors with a 10A fuse, wam bam thank you ma'am.
All in all the process took about 3 hours, longest part being i am ocd about cleanly and properly running wires. The leds are bright, best viewing angle is dead on, the pics are realistic as far as brightness and view angle. Have patience if you're going to do this project because it's not hard, just time consuming, pretty fun mod for something unique and different. Hope that helps.
Attachments
-
 95.5 KB Views: 32
 -
 94 KB Views: 29
 -
 69.9 KB Views: 29
 -
 94.5 KB Views: 28
Last edited:
Ricenoodle
New Member
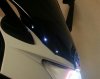
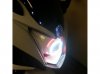
Final install. Notice the top 2 bolts are not viewable straight on due to the curved drop down edge of my double double bubble windscreen.
Attachments
-
 87.8 KB Views: 39
 -
 69.7 KB Views: 37
 -
 74.8 KB Views: 30
Last edited:
Ricenoodle
New Member
Dang restless aren't we, let me edit the pics and post and show you guys what i did.
We're like pitbulls in heat.Dang restless aren't we, let me edit the pics and post and show you guys what i did.
LMAOWe're like pitbulls in heat.
looks good, I wonder if you can even see them from the front or if the headlight just blinds them out. Can you install them on the fairings too and take pictures of that as well? LOL
Ricenoodle
New Member
No the headlight doesn't blind it out at all, view angles are different. Keep in mind these will come with washers but the screw will lock in with the stock washer already in place so i didn't need to remove the front cowl to do this install, otherwise it would've been a deal breaker because that would've been way to much work for some lighted bolts.
Ricenoodle
New Member
Don't tempt meLMAO
looks good, I wonder if you can even see them from the front or if the headlight just blinds them out. Can you install them on the fairings too and take pictures of that as well? LOL
 , first i need to know what size the top 3 fairing bolts are and then it should be easy from there.
lol agreed on that. And you were able to just plug them all in? I can't do that right now because I have other lights tied into the main and id have to strip them all again and start over which im just not in the mood for.No the headlight doesn't blind it out at all, view angles are different. Keep in mind these will come with washers but the screw will lock in with the stock washer already in place so i didn't need to remove the front cowl to do this install, otherwise it would've been a deal breaker because that would've been way to much work for some lighted bolts.
Ricenoodle
New Member
That's the beauty about these 3 port connectors which i found at home depot is i just strip the 2 sets of pos/neg for each side, plug them straight in each connector respectively depending on polarity, then i also have a 4 port one plugging into my running lights for my protons, plug them straight in after you strip the wire, plug and play basically. You can always do t-taps but it's hit and miss with those due to vibration shaking the connection loose.lol agreed on that. And you were able to just plug them all in? I can't do that right now because I have other lights tied into the main and id have to strip them all again and start over which im just not in the mood for.
Last edited:
ill have to look out for those at home depot. I bought a couple more strips for whenever I do get the urge to go fing with micro wires again. I was also considering these flush mounts. I have larger flush mounts now I like the look of but these are made for the fz6r hole like protons but half the price. 09 14 Yamaha FZ6R Flush Mount LED Turn Signals Kit Dual Circuit w Resistors | eBayThat's the beauty about these 3 port connectors which i found at home depot is i just strip the 2 sets of pos/neg for each side, plug them straight in each connector respectively depending on polarity, then i also have a 4 port one plugging into my running lights for my protons, plug them straight in after you strip the wire, plug and play basically. You can always do t-taps but it's hit and miss with those due to vibration shaking the connection loose.
Ravinx
New Member
side fairing boltsare 4mm and 1 5mm
I rather like those side emitting LED bolts, those would be pretty cool on my bike.These look pretty cool. I might swap this in for all my round head bolts on my fairings and wind screen.
Amazon.com: Sportbike LED Headlite / Windscreen Bolts, 6 Pk / 5mm with + 2 Top / Side Lite Chrome: Everything Else
Plenty of colors to choose from too.
I might have to try to find something like that for my bike.
im not sure what size they are, I thought 6, but I do know they are the same size as the windshield bolts because I bought red windshield bolts, didn't like them and put them on the side fairings instead. Looks like there is 5 or 6mm available in this set.side fairing boltsare 4mm and 1 5mm
Ricenoodle
New Member
Not sure if you're right on this, i know the top row and the 2 holding on to the mud guard are the same size, the bottom 2 and the back one are a larger size. i'll have to check when i get home. Regardless they'd be a PIA to route wires through to tap into the running lights on either side. Not hard to do but every bolt definately need to have a quick disconnect connector installed after the female clip for ease of future maintenance. Because you'd have to installed them in an accessible place that you can disconnect before you remove the fairing bolts. Hmmmm i may consider. Keep in mind that 4 out of 6 of the bolts are the same brightness, the side emitting led one is 7/10 as bright as the other ones so you'll have to buy 2 pack just to get 6 bolts of the same brightness if you're ocd like me. $40 bucks shipped for side bolts plus cost of quick disconnect connectors, $50 mod easily. Maybe if i'm bored one day.side fairing boltsare 4mm and 1 5mm
Last edited:
Ravinx
New Member
the top fairings bolts on my bike use the 4mm allen key and the main stay bolt uses my 5mm
That has nothing to do with the size of the threads though.the top fairings bolts on my bike use the 4mm allen key and the main stay bolt uses my 5mm
Ravinx
New Member
how so? a 1/4" bolt is a 1/4" bolt. 4mm is 4mm 5is 5 and so on