Muddog7998
New Member
Whatever the reason, our fairings get cracked and snapped. Rather easily too. Rather than spending $300 or more on a new fairing set, I found a simple way to fix the cracks.
**********************************
HOWEVER: I am not responsible for you giving yourself booboos, messing up your bike, or causing a thermonuclear war. I am simply showing how I fixed my cracks and how to reproduce what I did.
**********************************
Things you need:
1. A VERY ventilated area
2. Dust mask, gas mask, or something similar as there are some bad fumes that get released
3. Soldering iron or woodburner (I prefer the soldering iron since it gets hotter and I have extra tips for it.) Thin rounded tips are optional but helpful
4. Extra plastic (Mainly for larger cracks. Is used as a filler. Anything from a broken childs toy to a useless remote control will work)
5. Sandpaper (Personally used 100, 250, 350, and 600 grits)
6. Knife (exacto, leatherman, gerber, doesn't really matter)
7. Touchup paint
8. Patience
Let's begin!
Step 1. Plug in the soldering iron/woodburner. While waiting for it to heat up, go to step 2.
Step 2. Sand away the extra paint from the crack. The paint will start to bubble and just adds more gunk to work around. I used 100 grit to make it quick.

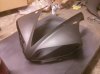
And this is just to show how bad the crack was...

Step 3. Prop the fairing in a way that is easy to get to the crack. You're going to be working on the inside of the fairing. If the crack is really bad, line up both sides of the crack and and tape, clamp, or just hold them together.
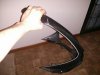
Step 4. Grab your mask and the soldering iron (Being military is helpful. Standard issue right here!)

Step 5. What you want to do is follow the crack over and over to create a deep groove. You do not want to burn all the way through to the other side, but you do want to get as close as possible.

Step 6. Once you have the groove, you'll notice the buildup of the plastic on the edges.

Using your iron, you're going to push that extra plastic back into the groove.

Step 7. Once you get all the plastic from the edges pushed back in, it should look somewhere close to this:

Now, that extra plastic I said you would need? You're gonna need it here. I used an adapter from an old car stereo I no longer need. I just melted a chunk off using my iron and put it in the groove.

You can also use the knife to make some extra shavings. Whichever you prefer.
Step 8. Hold your iron close to the shavings. You want the tip to barely touch, just enough so they start melting.

Step 9. Once they've melted, use the iron to smooth out the groove. Don't worry about making it perfect just yet. That's what sandpaper is for. This is how mine came out:

Step 10. At this point you're going to want to smoke, grab a beer, stand up and walk around, do whatever you need to. It's break time! The plastic will cool rather quickly, however I gave it about 5 minutes before I did anything else.
Step 11. Grab the roughest sandpaper you have and start sanding away. Progressively move to a finer and finer sandpaper. 600 grit is the highest I can find out here, so that's where I stopped.

Step 12. Now flip over the fairing so you are looking at the outside of the fairing. I went a little too deep into the groove and the plastic is starting to poke out on this side.

Step 13. You're going to be doing the same thing on this side, just a little gentler. Make the groove again but, it is going to be a very small one.

Step 14. Start pushing the plastic from the edges back into the groove, and use some extra shavings if need be. (I forgot to take a picture for this one, sorry guys)
Step 15. Start sanding again. Work your way up from roughest to finest. Here is how mine came out after a quick sanding.

Step 16. Wipe down all the dust from your fairings, grab the touchup paint, and have at it! I'm repainting the whole bike so I will have to update later with pictures of how the fairings look after getting painted.
THANKS FOR READING!
**********************************
HOWEVER: I am not responsible for you giving yourself booboos, messing up your bike, or causing a thermonuclear war. I am simply showing how I fixed my cracks and how to reproduce what I did.
**********************************
Things you need:
1. A VERY ventilated area
2. Dust mask, gas mask, or something similar as there are some bad fumes that get released
3. Soldering iron or woodburner (I prefer the soldering iron since it gets hotter and I have extra tips for it.) Thin rounded tips are optional but helpful
4. Extra plastic (Mainly for larger cracks. Is used as a filler. Anything from a broken childs toy to a useless remote control will work)
5. Sandpaper (Personally used 100, 250, 350, and 600 grits)
6. Knife (exacto, leatherman, gerber, doesn't really matter)
7. Touchup paint
8. Patience
Let's begin!
Step 1. Plug in the soldering iron/woodburner. While waiting for it to heat up, go to step 2.
Step 2. Sand away the extra paint from the crack. The paint will start to bubble and just adds more gunk to work around. I used 100 grit to make it quick.
And this is just to show how bad the crack was...
Step 3. Prop the fairing in a way that is easy to get to the crack. You're going to be working on the inside of the fairing. If the crack is really bad, line up both sides of the crack and and tape, clamp, or just hold them together.
Step 4. Grab your mask and the soldering iron (Being military is helpful. Standard issue right here!)
Step 5. What you want to do is follow the crack over and over to create a deep groove. You do not want to burn all the way through to the other side, but you do want to get as close as possible.
Step 6. Once you have the groove, you'll notice the buildup of the plastic on the edges.
Using your iron, you're going to push that extra plastic back into the groove.
Step 7. Once you get all the plastic from the edges pushed back in, it should look somewhere close to this:
Now, that extra plastic I said you would need? You're gonna need it here. I used an adapter from an old car stereo I no longer need. I just melted a chunk off using my iron and put it in the groove.
You can also use the knife to make some extra shavings. Whichever you prefer.
Step 8. Hold your iron close to the shavings. You want the tip to barely touch, just enough so they start melting.
Step 9. Once they've melted, use the iron to smooth out the groove. Don't worry about making it perfect just yet. That's what sandpaper is for. This is how mine came out:
Step 10. At this point you're going to want to smoke, grab a beer, stand up and walk around, do whatever you need to. It's break time! The plastic will cool rather quickly, however I gave it about 5 minutes before I did anything else.
Step 11. Grab the roughest sandpaper you have and start sanding away. Progressively move to a finer and finer sandpaper. 600 grit is the highest I can find out here, so that's where I stopped.
Step 12. Now flip over the fairing so you are looking at the outside of the fairing. I went a little too deep into the groove and the plastic is starting to poke out on this side.
Step 13. You're going to be doing the same thing on this side, just a little gentler. Make the groove again but, it is going to be a very small one.
Step 14. Start pushing the plastic from the edges back into the groove, and use some extra shavings if need be. (I forgot to take a picture for this one, sorry guys)
Step 15. Start sanding again. Work your way up from roughest to finest. Here is how mine came out after a quick sanding.
Step 16. Wipe down all the dust from your fairings, grab the touchup paint, and have at it! I'm repainting the whole bike so I will have to update later with pictures of how the fairings look after getting painted.
THANKS FOR READING!