It's very simple to do and can improve the comfort of your bike. Grab a snack and follow along  You do need a 5 mm Allen key to remove the main seat.
Start off by removing your rear (passenger) seat. Easily done with the key in the side of the bike.
Now, you need to remove the primary (rider) seat. There are two bolts that require an Allen key of 5 mm to remove, facing the back of the bike. See the 3rd picture below if you can't find them.
Alas, you are almost half-way done already. The picture below is what you should see. There are two bolts (one on each side) that are holding that piece of plastic in place. The plastic plate is the base on which the seat is mounted.

All you do is remove the 2 bolts, slide the plate towards the back to raise the seat, or towards the front to lower it. Replace the bolts in the other position, and voila!

As you can see, Red indicates the High seat position; blue is the Low position.
The arrows indicate which way to slide to get which position. The dots indicate the four spots the seat "stubs" will sit on the plate for each position.
Now, you need to put the primary seat back on. You will notice that it is higher now, and that different holes line up for the bolts. You need to physically reverse the spacers that were facing the front of the bike when the seat was low, so they face the rear of the bike when it is being raised...

... Blue is the stock holes, red is the higher seat position holes.
Put the rear seat back on, and you're done!
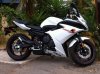
Here is a close-up of the finished result of raising the seat. It isn't as noticeable from far off. Enjoy!!

Senaca :canada:
You do need a 5 mm Allen key to remove the main seat.Start off by removing your rear (passenger) seat. Easily done with the key in the side of the bike.
Now, you need to remove the primary (rider) seat. There are two bolts that require an Allen key of 5 mm to remove, facing the back of the bike. See the 3rd picture below if you can't find them.
Alas, you are almost half-way done already. The picture below is what you should see. There are two bolts (one on each side) that are holding that piece of plastic in place. The plastic plate is the base on which the seat is mounted.
All you do is remove the 2 bolts, slide the plate towards the back to raise the seat, or towards the front to lower it. Replace the bolts in the other position, and voila!
As you can see, Red indicates the High seat position; blue is the Low position.
The arrows indicate which way to slide to get which position. The dots indicate the four spots the seat "stubs" will sit on the plate for each position.
Now, you need to put the primary seat back on. You will notice that it is higher now, and that different holes line up for the bolts. You need to physically reverse the spacers that were facing the front of the bike when the seat was low, so they face the rear of the bike when it is being raised...
... Blue is the stock holes, red is the higher seat position holes.
Put the rear seat back on, and you're done!
Here is a close-up of the finished result of raising the seat. It isn't as noticeable from far off. Enjoy!!
Senaca :canada: