I'm thinking about installing a screaming banshee or strebel horn. I remember seeing that someone on the forum had done this. I was just wondering where you installed it. Not exactly alot of spots it can go. I just removed the top fairings to intsall new mirrors and noticed two nice spots to the left and right of the tank under the fairing. I know Banshee makes a split system, not sure about Strebel, can't seem to find any info on that. I thought I could mount the horn on one side and the compressor on the other? Also, anyone know if I could bypass the flashing light feature? I appreciate any information you can give me.

screaming Banshee horn
- Thread starter jgelack
- Start date
You can bypass the flashing light feature by changing the position of the jumper on the control module. You get the horn (which is basically a strebel I think) and a little control box. You can use the jumper to have flashing lights, no flashing lights and delay from when you hit the horn button that it waits to go from your stock horn to the Banshee.
I just went on their web site and saw that you can order the horn without the flashing light function for $50 less. Is it a big improvement over the stock horn? Where did you mount it ?You can bypass the flashing light feature by changing the position of the jumper on the control module. You get the horn (which is basically a strebel I think) and a little control box. You can use the jumper to have flashing lights, no flashing lights and delay from when you hit the horn button that it waits to go from your stock horn to the Banshee.
The Banshee is 139db I think, compared to our stock horn of a "tweet tweet"!I just went on their web site and saw that you can order the horn without the flashing light function for $50 less. Is it a big improvement over the stock horn? Where did you mount it ?
 Should be alot better.
I actually haven't mounted mine yet. *lazy slow I know....
Last year when I was working on my Projector retrofit I was toying around trying to find spots to mount it. Because it says to try and put it in a place where the flute of the horn will not get water in it, I wanted to put it in the front fairing somewhere. However, I could not find a suitable spot to mount it securely and not interfere with the turn to lock of the forks/handlebars.
I have now eyed just taking off the stock horn and re-routing the stock to just below the gas tank on the left (as you sit on the bike) by the hole in the metal frame where the wires come out of, mounting it via bracket to the bolt right by there. Then running the wire up to where the stock horn was and mounting the Banshee in the stock location. This will expose the flute of the horn to water/bugs during riding or washing, but I try to rarely ride in the rain anyways and can maybe shove a small bag in the flute during washing to protect from water going up and in.
Full Plug & Play Screamer System
Looks like it would probably be the easiet to install since could take out the stock horn entirely then is seems and appears to fit in same spot. Not as loug, but 120db is probably plenty loud enough to get attention. Heck even with the stock tweeter, I still get attention when I accidently bleet at people when trying to work the turn signal button.. LOL, so I personally want that multi tone of stock/banshee or the dual tone.. I dont want to yell at someone accidently!
Here's a thread I made on the installation of my Stebel Nautilus dual tone horn on my other bike. Maybe this will give you some ideas of what is possible:
http://www.triumph675.net/forum/showthread.php?t=71633 How To Mount a Stebel Nautilus Air Horn on ST3
I plan on doing something similar on the 6R. I'll probably have the horn part mounted under the fairing or right above the fairing under that little fin like plastic piece.
Sent from my Nexus 7 using Tapatalk HD
Screaming Banshee Install with pics
Hi all,
This thread is the #1 google result for "fz6 screaming banshee install", and I couldn't find anywhere else that actually showed it being installed. I finally got all the kinks worked out and installed yesterday, so I thought I'd share to help someone else out. Both in getting ideas on what worked for me, and hopefully avoiding the pitfalls I hit.
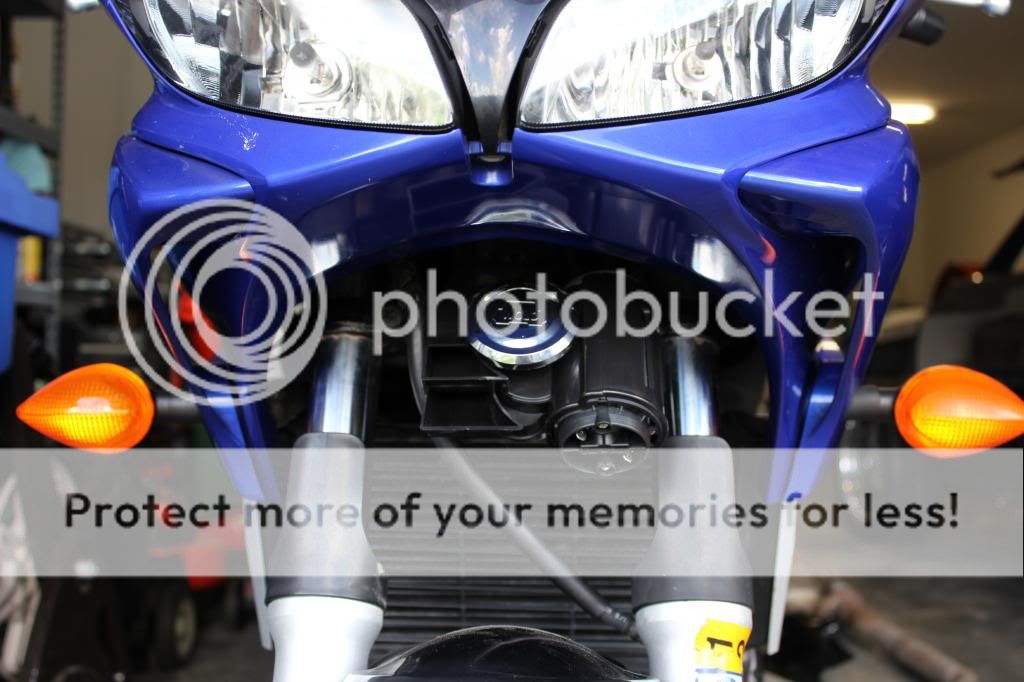
First, I tried every different way I could think of to install the banshee under the black pieces on either side of the tank. The thing is just too big to fit there, at least anyway I tried. I bought the all-in-one banshee assembly; I may have had better luck with the split system. I also ordered their 90 degree bracket so that I had options with trying to mount the thing.
It wasn't happening under the black pieces, so I put it in the stock location using their standard bracket as an offset piece.
Tried mounting the stock horn under the black piece to the left of the tank, using one of the screws that holds on the extra fairing piece. The wires didn't reach with the forks turning, and I didn't want to deal with running extra wires, so I tried a different combination.
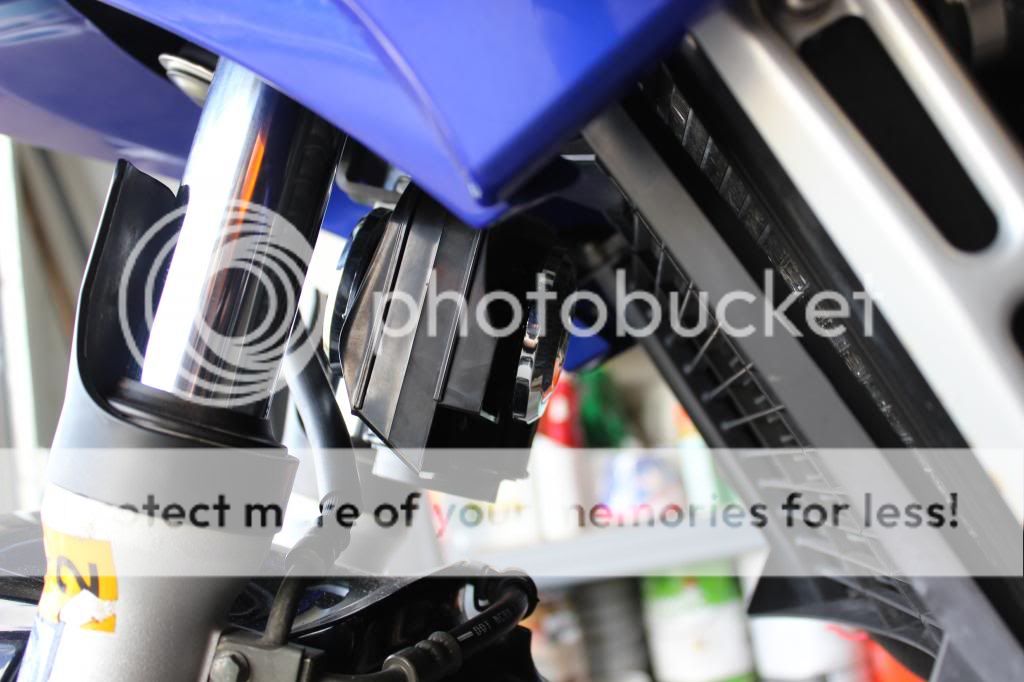
You can see the interference with the fork and the Banshee here:
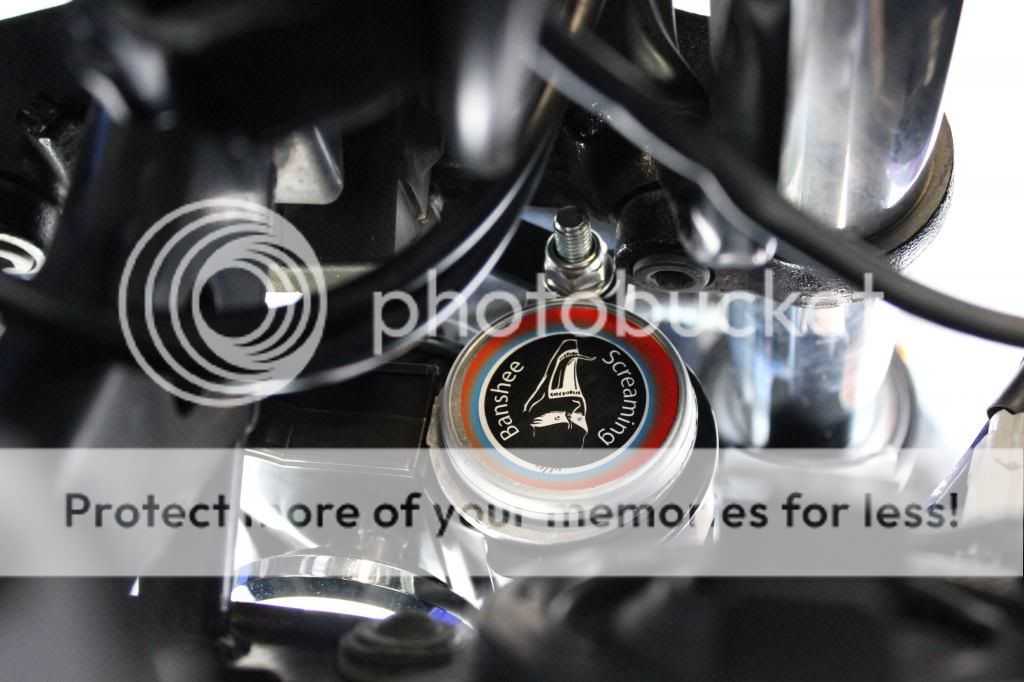
So I tried using the 90deg bracket and came up with this:
Success! Or so I thought. The wires reached without modification, no interference with the forks at full lock on either side. You can probably see the problem here, where I was showing the horn facing backwards (to avoid rainwater/bugs a bit).
Turns out that round thing on the front of the bike goes up and down or something? Who knew?! After a short trip and going over a dip transition, I cracked my fender with the banshee. So I'll be replacing the fender.
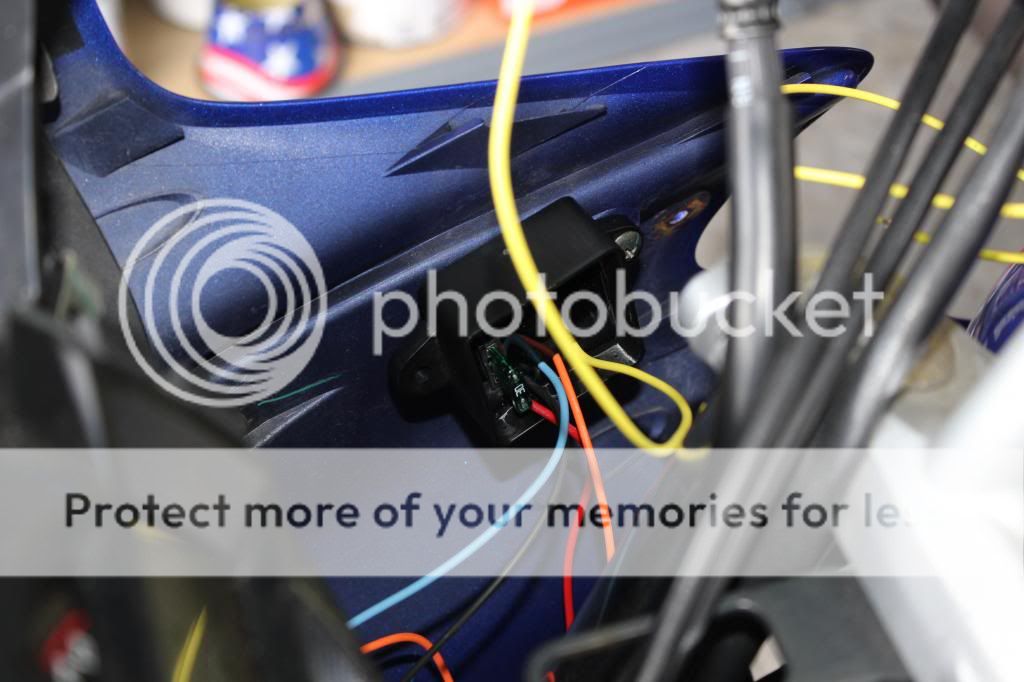
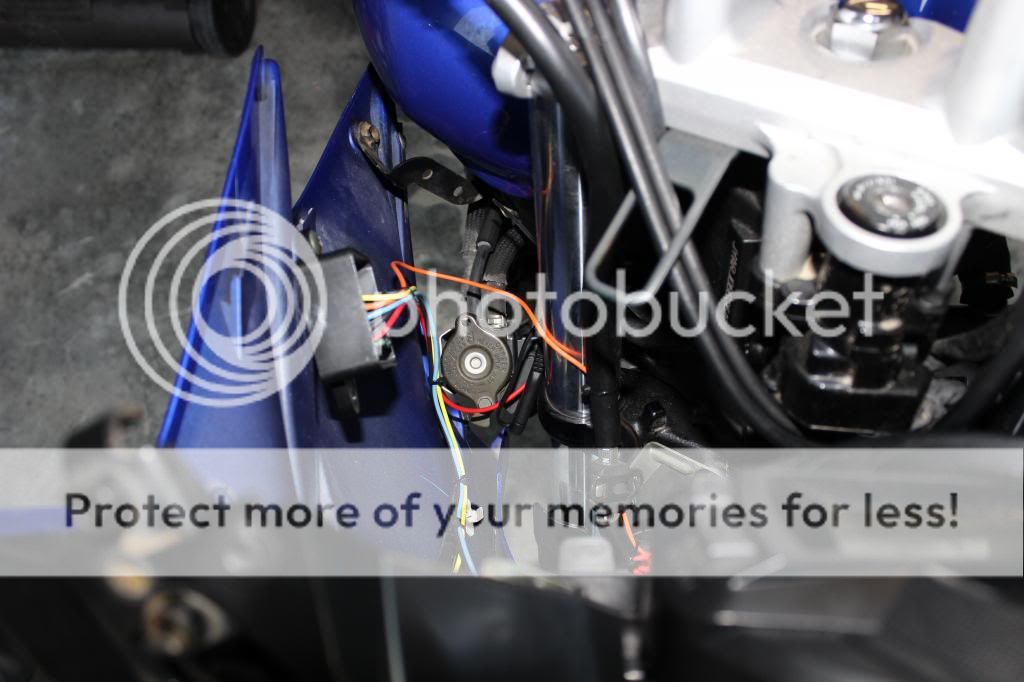
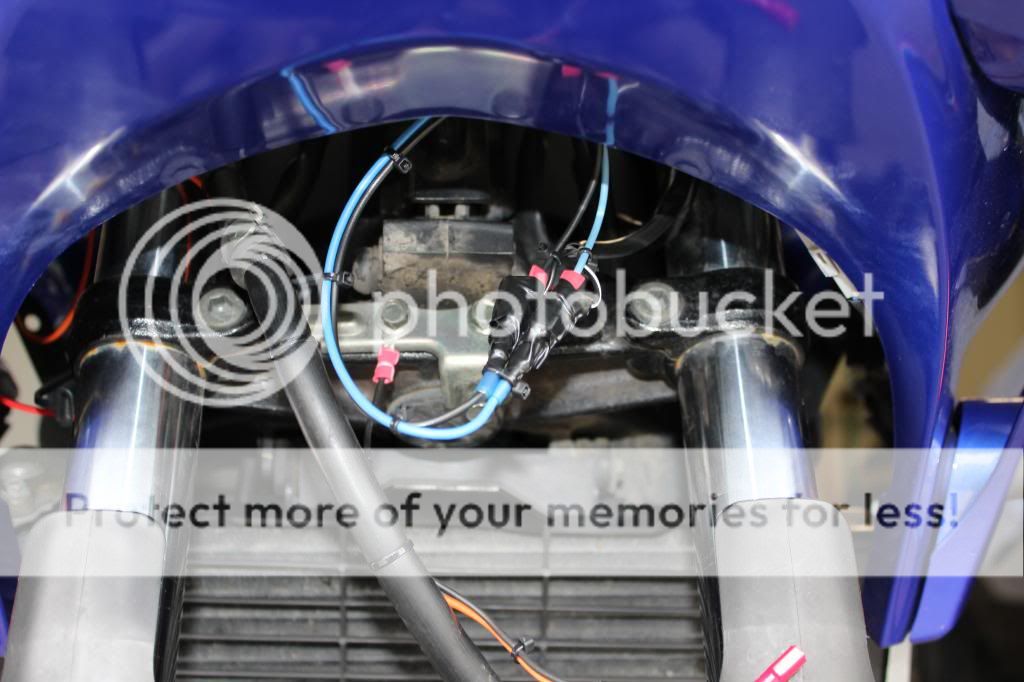
Easily mounted the control module under the black plastic to the right of the tank, using the same screw as I originally did for the stock horn.
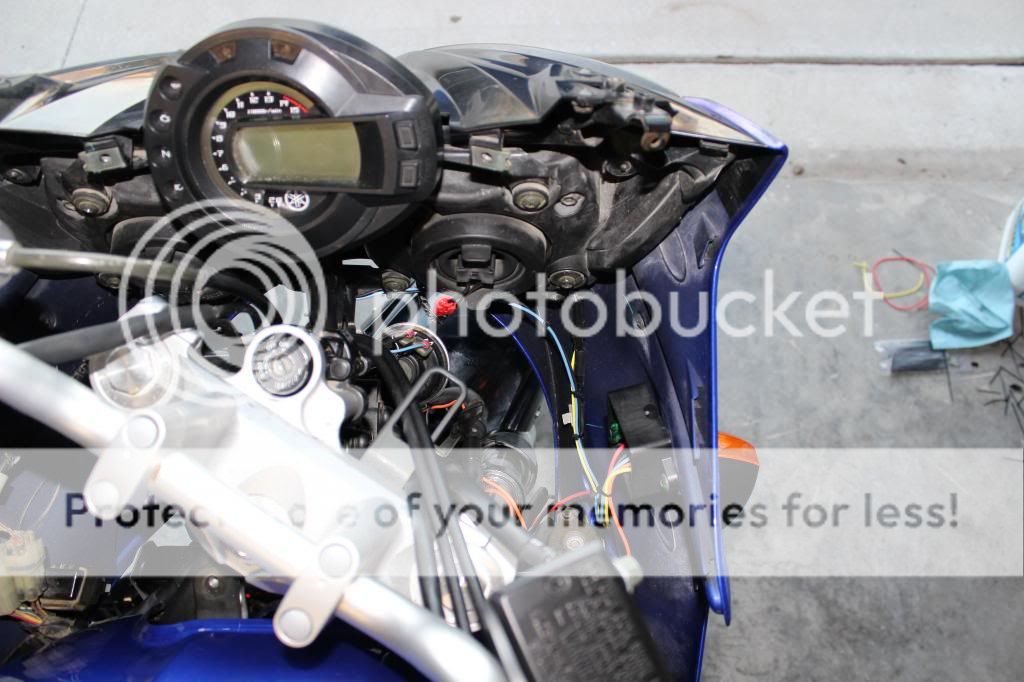
Neatened up wires with tie-wraps. Ran the high-beam yellow wire along the stock harness around the front of the headlight and tandem-joined it near the plug.
Another mistake I made, and I should have known better (I'm an electrician). I assumed rather than tested, and thought the striped wire was the common for the headlight. It isn't. The solid black is the common. So I blew the control module fuse when I tried to use the damn thing.
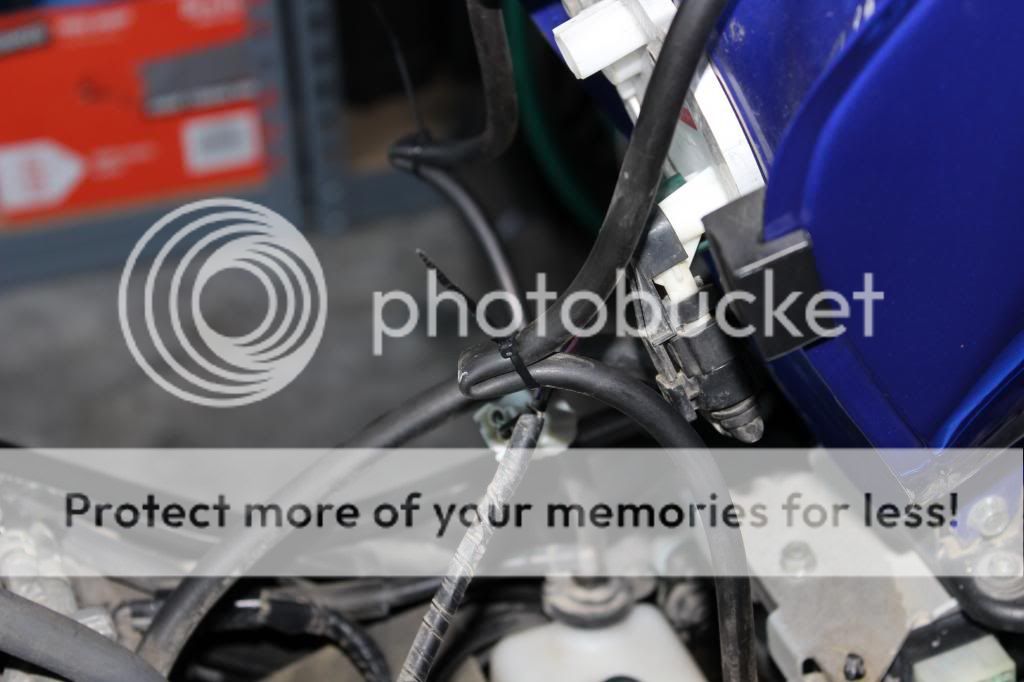
Ran the horn positive wire down the front brake hose, tie-wrapping it along the back.
 [/URL]
The common is just a short piece you terminate with a ring terminal and put it to a good ground. I used one of the bolts on the stock horn mounting bracket.
I also learned that the hoses coming off the tank are vent lines, as I started smelling gas dripping on the floor a minute after I lifted the tank to get to the battery. So I pinched them temporarily.
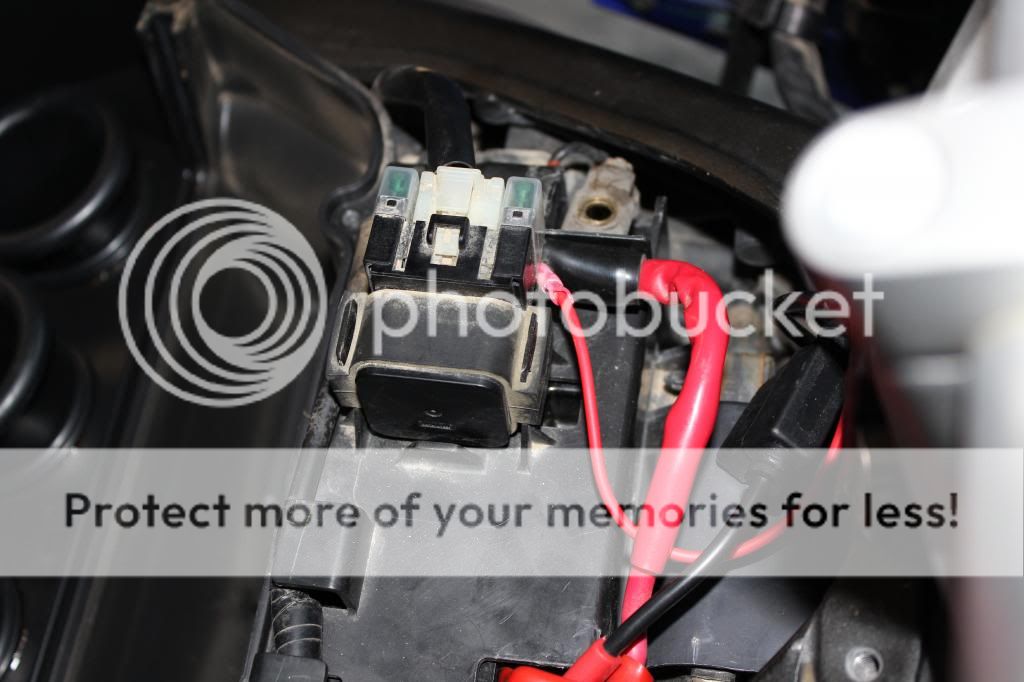
The small red wire goes to the module for steady power. Routed it through the frame into the battery area and terminated it with the supplied ring terminal. I didn't put it on the actual battery 'post' because the dealership where I bought the bike (or the previous owner) had put an easy battery charging extension on it. Don't think I'll need it but I left it on there anyway. So I wired the control module to the fuse block positive.
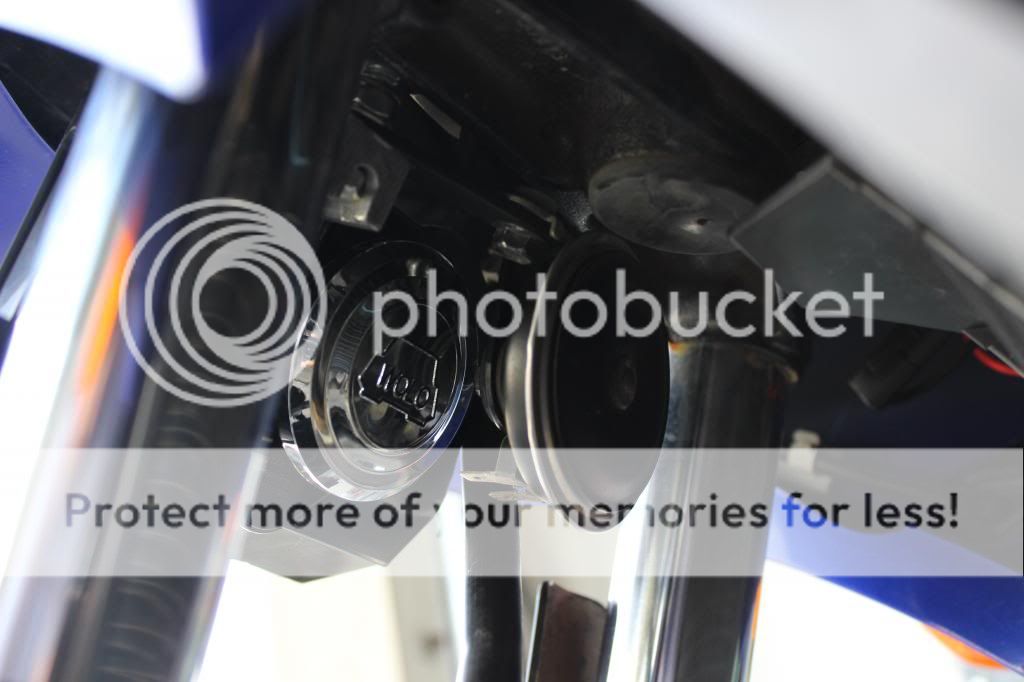
So after cracking my fender, I decided that putting extension wires on wasn't such a bad thing after all. I would put the Banshee and the stock horn in the first places I had them, and wire as necessary.
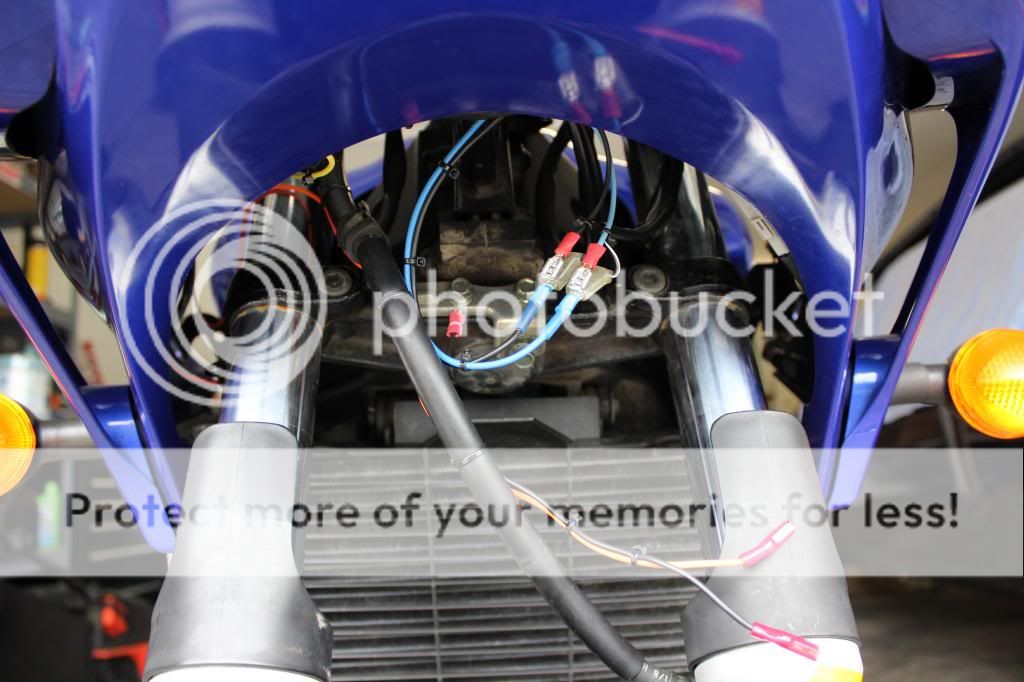
Here you can see where the Banshee common is going to the bracket bolt, plus the extension wires I'm putting on, and how much I love tie-wraps. For the extension wires, I used quick-connects that have heat-shrink on the back end. I would have liked to have used heat-shrinkable piggy-back quick-connects for the module connection, but I didn't see any at the parts store or Home Depot.
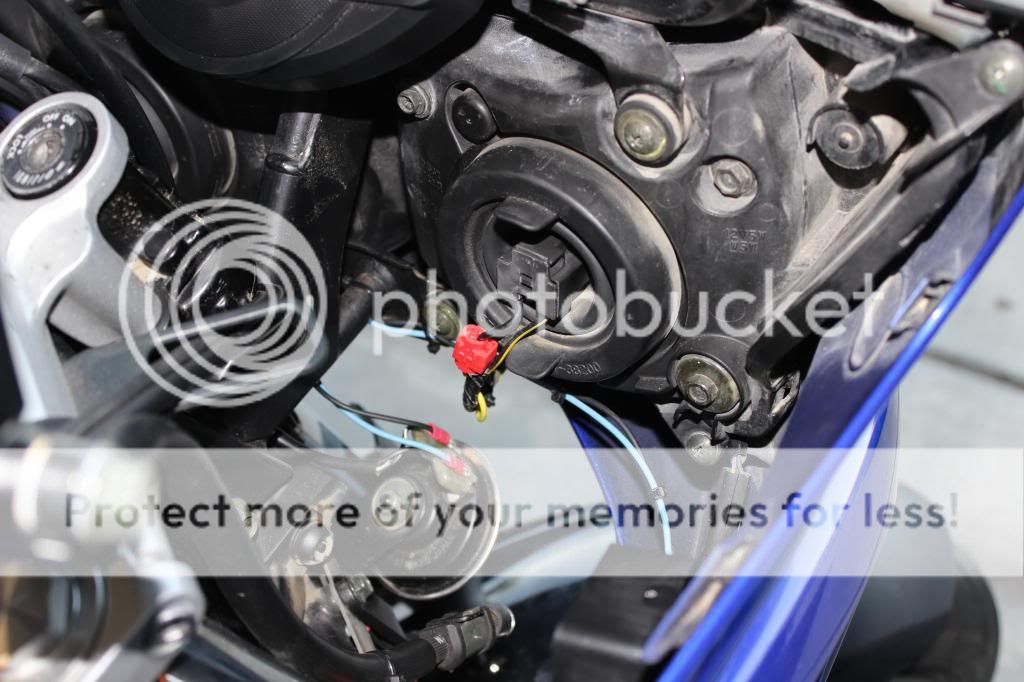
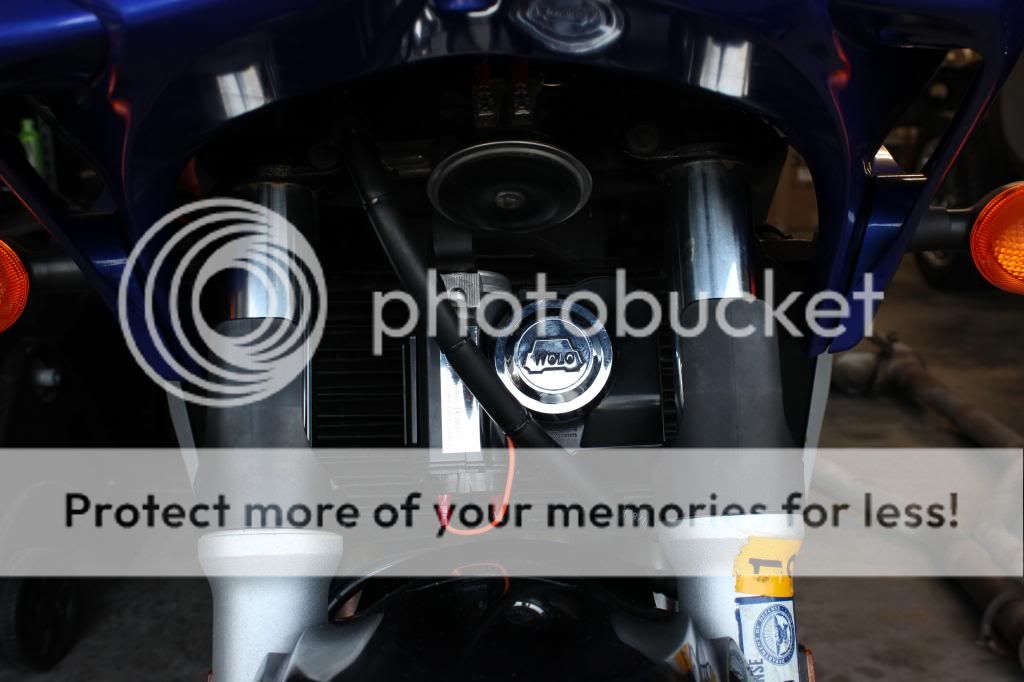
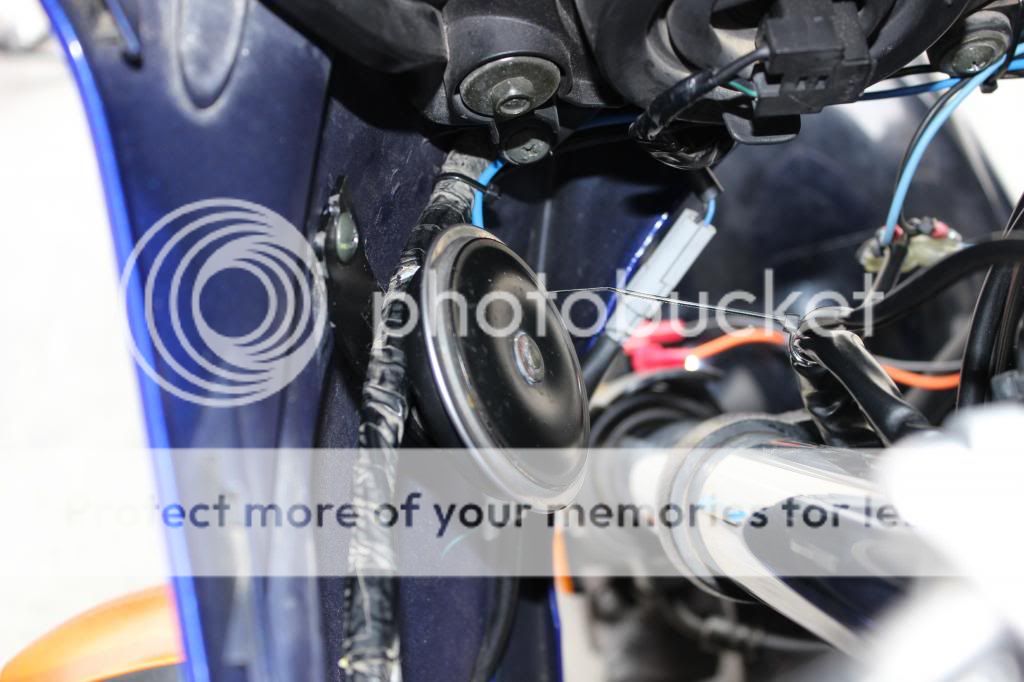
Stock horn final location. I ended up bending the stock bracket a little bit to give more room for the quick-connects to attach to the stock horn tabs. Extension wires routed to the front headlight lower bracket but not all the way around the front of the headlight. Tie-wrapped the factory horn harness to another harness to keep it from flopping around.
All taped up to prevent accidental shorting out.
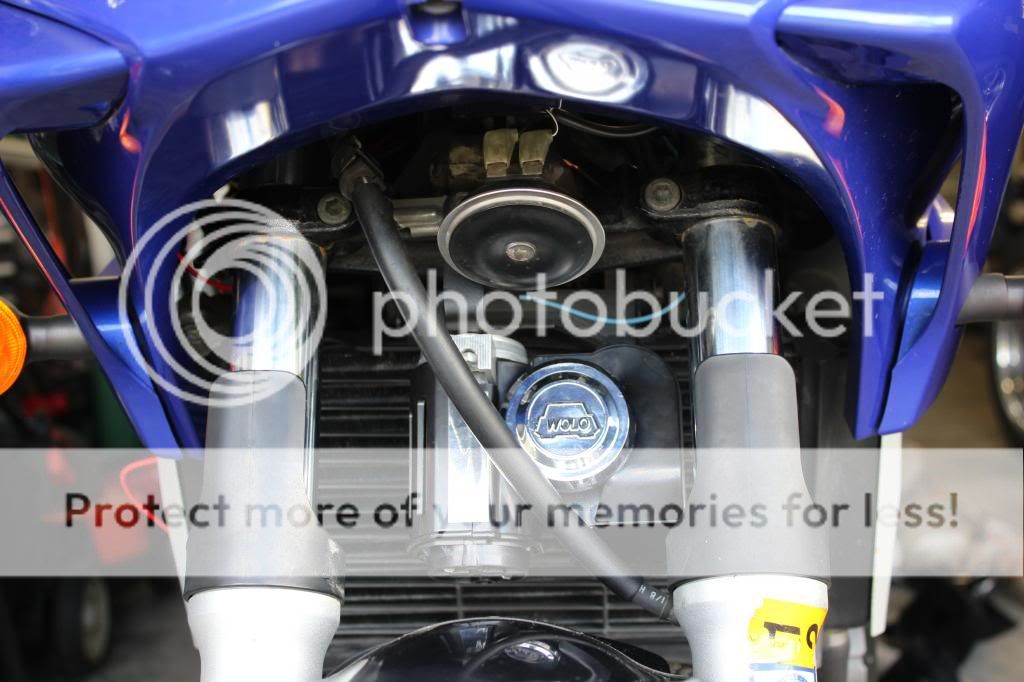
So there it is. The Screaming Banshee is exposed to rain, but I could not find any other way to install this thing. It sounds loud as hell and I love it.
Hi all,
This thread is the #1 google result for "fz6 screaming banshee install", and I couldn't find anywhere else that actually showed it being installed. I finally got all the kinks worked out and installed yesterday, so I thought I'd share to help someone else out. Both in getting ideas on what worked for me, and hopefully avoiding the pitfalls I hit.
First, I tried every different way I could think of to install the banshee under the black pieces on either side of the tank. The thing is just too big to fit there, at least anyway I tried. I bought the all-in-one banshee assembly; I may have had better luck with the split system. I also ordered their 90 degree bracket so that I had options with trying to mount the thing.
It wasn't happening under the black pieces, so I put it in the stock location using their standard bracket as an offset piece.
Tried mounting the stock horn under the black piece to the left of the tank, using one of the screws that holds on the extra fairing piece. The wires didn't reach with the forks turning, and I didn't want to deal with running extra wires, so I tried a different combination.
You can see the interference with the fork and the Banshee here:
So I tried using the 90deg bracket and came up with this:
Success! Or so I thought. The wires reached without modification, no interference with the forks at full lock on either side. You can probably see the problem here, where I was showing the horn facing backwards (to avoid rainwater/bugs a bit).
Turns out that round thing on the front of the bike goes up and down or something? Who knew?! After a short trip and going over a dip transition, I cracked my fender with the banshee. So I'll be replacing the fender.
Easily mounted the control module under the black plastic to the right of the tank, using the same screw as I originally did for the stock horn.
Neatened up wires with tie-wraps. Ran the high-beam yellow wire along the stock harness around the front of the headlight and tandem-joined it near the plug.
Another mistake I made, and I should have known better (I'm an electrician). I assumed rather than tested, and thought the striped wire was the common for the headlight. It isn't. The solid black is the common. So I blew the control module fuse when I tried to use the damn thing.
Ran the horn positive wire down the front brake hose, tie-wrapping it along the back.
The common is just a short piece you terminate with a ring terminal and put it to a good ground. I used one of the bolts on the stock horn mounting bracket.
I also learned that the hoses coming off the tank are vent lines, as I started smelling gas dripping on the floor a minute after I lifted the tank to get to the battery. So I pinched them temporarily.
The small red wire goes to the module for steady power. Routed it through the frame into the battery area and terminated it with the supplied ring terminal. I didn't put it on the actual battery 'post' because the dealership where I bought the bike (or the previous owner) had put an easy battery charging extension on it. Don't think I'll need it but I left it on there anyway. So I wired the control module to the fuse block positive.
So after cracking my fender, I decided that putting extension wires on wasn't such a bad thing after all. I would put the Banshee and the stock horn in the first places I had them, and wire as necessary.
Here you can see where the Banshee common is going to the bracket bolt, plus the extension wires I'm putting on, and how much I love tie-wraps. For the extension wires, I used quick-connects that have heat-shrink on the back end. I would have liked to have used heat-shrinkable piggy-back quick-connects for the module connection, but I didn't see any at the parts store or Home Depot.
Stock horn final location. I ended up bending the stock bracket a little bit to give more room for the quick-connects to attach to the stock horn tabs. Extension wires routed to the front headlight lower bracket but not all the way around the front of the headlight. Tie-wrapped the factory horn harness to another harness to keep it from flopping around.
All taped up to prevent accidental shorting out.
So there it is. The Screaming Banshee is exposed to rain, but I could not find any other way to install this thing. It sounds loud as hell and I love it.