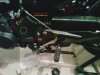
First thing I did was clean my chain. To make it a bit easier I decided to remove the chain guard, not really necessary. I also removed the foot peg/shifter assembly, mostly so I could get to the front bolt of the chain guard. You could skip these steps if you want. I used a swingarm lift for this operation.
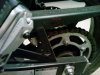
1. Remove the sprocket cover.
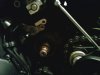
2. Remove the large bolt/washer holding the sprocket. It requires a 30mm socket, so make sure you have that ahead of time. You also might need to heat up the nut to loosen up the loctite. I used a breaker bar. You'll need to use the rear brake to keep the nut from turning or wedge the rear tire.
3. Loosen the adjustment bolt and slide the rear tire forward enough to create some slack in the chain.
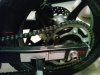
4. Remove the chain guide. Part of the clutch is in front of it, move that out of the way.
5. Take the chain off the front sprocket and pull the sprocket off the drive shaft.
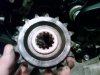
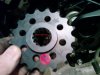
The new sprocket is 17 teeth and made by Driven.
6. Determine which side has the raised lip (mine also had a sticker) and make sure that side of the sprocket is facing inward when you put it on.
7. Screw in the nut/washer to slide the sprocket onto the drive shaft instead of hammering it in.
8. Unscrew the nut, apply loctite, then screw it back in.
9. Rap the chain around the new sprocket. It's best if you remove the chain from the rear sprocket.
10. Get the chain started on the rear sprocket and then just spin the wheel, it should slip into place.
11. Reassembly everything else, make sure the chain guide is centered correctly.
12. Check the chain slack and adjust as need be, it should be a notch or so forward from stock.
I would suggest testing the new sprocket a few times while it's still on the lift. First by spinning the tire by hand a bit. Then by letting it slowly spin by itself in 1st. If it's all good, lube the chain well and take it for a test ride.
1. Remove the sprocket cover.
2. Remove the large bolt/washer holding the sprocket. It requires a 30mm socket, so make sure you have that ahead of time. You also might need to heat up the nut to loosen up the loctite. I used a breaker bar. You'll need to use the rear brake to keep the nut from turning or wedge the rear tire.
3. Loosen the adjustment bolt and slide the rear tire forward enough to create some slack in the chain.
4. Remove the chain guide. Part of the clutch is in front of it, move that out of the way.
5. Take the chain off the front sprocket and pull the sprocket off the drive shaft.
The new sprocket is 17 teeth and made by Driven.
6. Determine which side has the raised lip (mine also had a sticker) and make sure that side of the sprocket is facing inward when you put it on.
7. Screw in the nut/washer to slide the sprocket onto the drive shaft instead of hammering it in.
8. Unscrew the nut, apply loctite, then screw it back in.
9. Rap the chain around the new sprocket. It's best if you remove the chain from the rear sprocket.
10. Get the chain started on the rear sprocket and then just spin the wheel, it should slip into place.
11. Reassembly everything else, make sure the chain guide is centered correctly.
12. Check the chain slack and adjust as need be, it should be a notch or so forward from stock.
I would suggest testing the new sprocket a few times while it's still on the lift. First by spinning the tire by hand a bit. Then by letting it slowly spin by itself in 1st. If it's all good, lube the chain well and take it for a test ride.
Attachments
-
 1dirtychain.jpg80.7 KB · Views: 335
 -
 2fullchain.jpg81 KB · Views: 308
 -
 3cleanchain.jpg88.2 KB · Views: 285
 -
 4spocketcover.jpg74.7 KB · Views: 291
 -
 8sprocketrear.jpg80.5 KB · Views: 296
 -
 6chainguard.jpg67.1 KB · Views: 294
 -
 5sprocketnut.jpg70.5 KB · Views: 302
 -
 9nosprocket.jpg67.9 KB · Views: 295
 -
 10oldsprocket.jpg76.5 KB · Views: 313
 -
 11newsprocket.jpg74.6 KB · Views: 321