
Here's a how-to write up on changing out your spark plugs. I replaced the stock plugs with NGK CR9EIX Iridium spark plugs. It took me just over two hours to do the change out from start to test ride, but I took my time and could do it in less than an hour next time, knowing what I know now. It's a pretty easy job IF you are mechanically inclined. (My disclamer - If changing the oil is intimidating to you, don't try this at home)
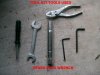
I only used the tool kit that came with our bikes in order to show that you can do it all with just those tools. Next time, I will use other tools I have to make things easier, but for this time around, I used only the tool kit tools. (the spark plug tool is a must). I will try to keep this write up in simple terms.
I'm not going to go through all the steps in great detail, just show you some of the pictures of things you'll encounter.
Here we go....
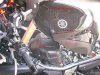
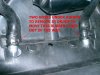
STEP 1: Put bike up on rear stand or your center stand if you have one. Remove both side fairings and one of the plastic inside top pieces that surround the gas tank. There is also a small plastic piece on the sides below the gas tank. Removing this gives you move room to access the plugs from the sides. (Pic 1)
STEP 2: Remove the main seat and the tray below it (the height adjustment tray)
STEP 3: Remove the two bolts on the front of the gas tank. (Make sure you have almost no gas left in it. I had about a half gallon left in mine.) You can then rotate the tank up (the rear pivots) and prop it up with a 2x4 or something. That way you don't have to remove all the connections to the tank. Way easier to just rotate it up. (Pic 2)
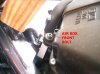
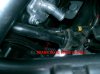
STEP 4: Under the tank is the air box. There is one bolt on the front of the air box, remove that one. (Pic 3) Also, remove the hose on the right front of the air box. Next, there are two bolts/clamps on the bottom rear of the air box on either side. Just loosen these up. Then, remove the three hoses on the back of the air box and unclip the wire connector on the left rear of the air box. (Pic 4) After everything is removed/loosened, lift air box out and take it out.
STEP 5: Under the air box, there is a rubber liner that needs to be moved out of the way. To do this, remove the reuseable zip ties (Pic 5) (there is a little tab on the zip tie that you can push down to loosen up the zip tie to reuse it.) and the two hose clamps on the bottom. (Pic 6) This rubber liner needs to be removed or moved out of the way in order to gain access to the top of the engine and spark plugs.
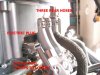
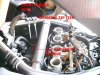
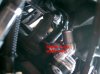
STEP 6: Remove one spark plug wire cover one at a time. (pic 7) They just pull off with a little upward force. Once they pop off, they are quite long. (pic 8) Then use the long spark plug tool from the tool kit and remove the spark plug. (Pic 9) Before you replace with the new spark plug, I suggest putting on some anti-seize lubricant on the threads. Put in new plugs and replace wires.
STEP 7: Put everything back together the opposite way you removed it. Start it up and take a test ride.
I do feel that these Iridium plugs made the bike seem to run smoother with less vibration. Plus, they should last longer than stock, hence not have to replace them as soon. Hope this write up helps.
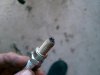
(Pic 10 - Stock plug with over 13k miles on it)
4/17/2012: DONT KNOW WHAT HAPPENED TO THE PICS. Here they are, reposted
I only used the tool kit that came with our bikes in order to show that you can do it all with just those tools. Next time, I will use other tools I have to make things easier, but for this time around, I used only the tool kit tools. (the spark plug tool is a must). I will try to keep this write up in simple terms.
I'm not going to go through all the steps in great detail, just show you some of the pictures of things you'll encounter.
Here we go....
STEP 1: Put bike up on rear stand or your center stand if you have one. Remove both side fairings and one of the plastic inside top pieces that surround the gas tank. There is also a small plastic piece on the sides below the gas tank. Removing this gives you move room to access the plugs from the sides. (Pic 1)
STEP 2: Remove the main seat and the tray below it (the height adjustment tray)
STEP 3: Remove the two bolts on the front of the gas tank. (Make sure you have almost no gas left in it. I had about a half gallon left in mine.) You can then rotate the tank up (the rear pivots) and prop it up with a 2x4 or something. That way you don't have to remove all the connections to the tank. Way easier to just rotate it up. (Pic 2)
STEP 4: Under the tank is the air box. There is one bolt on the front of the air box, remove that one. (Pic 3) Also, remove the hose on the right front of the air box. Next, there are two bolts/clamps on the bottom rear of the air box on either side. Just loosen these up. Then, remove the three hoses on the back of the air box and unclip the wire connector on the left rear of the air box. (Pic 4) After everything is removed/loosened, lift air box out and take it out.
STEP 5: Under the air box, there is a rubber liner that needs to be moved out of the way. To do this, remove the reuseable zip ties (Pic 5) (there is a little tab on the zip tie that you can push down to loosen up the zip tie to reuse it.) and the two hose clamps on the bottom. (Pic 6) This rubber liner needs to be removed or moved out of the way in order to gain access to the top of the engine and spark plugs.
STEP 6: Remove one spark plug wire cover one at a time. (pic 7) They just pull off with a little upward force. Once they pop off, they are quite long. (pic 8) Then use the long spark plug tool from the tool kit and remove the spark plug. (Pic 9) Before you replace with the new spark plug, I suggest putting on some anti-seize lubricant on the threads. Put in new plugs and replace wires.
STEP 7: Put everything back together the opposite way you removed it. Start it up and take a test ride.
I do feel that these Iridium plugs made the bike seem to run smoother with less vibration. Plus, they should last longer than stock, hence not have to replace them as soon. Hope this write up helps.
(Pic 10 - Stock plug with over 13k miles on it)
4/17/2012: DONT KNOW WHAT HAPPENED TO THE PICS. Here they are, reposted
Attachments
-
 CIMG3534.jpg95 KB · Views: 1,462
 -
 CIMG3519.jpg97.1 KB · Views: 1,414
 -
 CIMG3521.jpg96 KB · Views: 1,352
 -
 CIMG3522.jpg94 KB · Views: 1,346
 -
 CIMG3524.jpg97.6 KB · Views: 1,432
 -
 CIMG3531.jpg96.8 KB · Views: 1,408
 -
 CIMG3527.jpg95.7 KB · Views: 1,411
 -
 CIMG3526.jpg94.5 KB · Views: 1,360
 -
 CIMG3535.jpg97.5 KB · Views: 1,325
 -
 CIMG3525.jpg103.8 KB · Views: 1,401
Last edited:
")
