
Here some insight on "How to" check your valves adjustment. It can be a little time consuming at first but it is a very easy task to do, even for the ones a bit less experimented. Now to adjust it is a different ball game. It required you to completely remove the camshaft, the follower and change the spacer on top of the valve. Even there, it's not that hard. Just take your time and make sure all the timing mark line up...
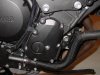
So, I will assume that you can remove the seats, gas tank and air box. If you can get through those step on your own you can either read other threads, or simply bring your bike to a dealership near you...lol
Step1:
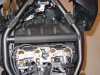
Once you get to the point that you can actually see the valve cover, throttle body... we're getting started. In order to be able to remove the valve cover you need to move the throttle body assembly out of the way. Basically you need to disconnect the throttle cable (2 Phillips screws), loosing up the 4 collars on each intake runner (3mm Allen key)
To have access to the throttle plate, you need to remove the big black plate on the right hand side (4 bolts - 12mm socket). Once that's out of the way, remove the 2 Phillips screws to remove the cable holder from the throttle assembly, then disconnect the cables. Use a long extension with a 3mm Allen socket and loosing up all 4 screws on the collars. When that's done, just pull up on the throttle assembly. You won't be able to pull it all out since the coolant hose is still attach, but it's ok.
Step2:
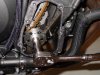
Disconnect the spark plug cables. Remove the 6 bolts on top of the valve cover (5mm Allen key). Pull up on the cover, then back a little and rotate CCW to clear the frame rail. Push the throttle assembly out of the way then the valve cover will get out easy. At this point you can see the cams and all the other goodies. You can also remove the spark plugs at this point, It make it much easier to spin the crankshaft...
Step3:
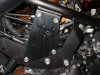
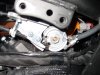
Remove the timing chain cover on the right hand side of the engine (5mm Allen key) and just put it on the side. You can use a ty-rap to keep it out of the way. A good 3/8" drive ratchet with a 12mm socket will fit on the center bolts. Remove the gasket and line up the "T" timing mark with the mark on the case (left) The mark on the cams gear should line up with the edge of the head also.
Step4:
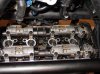
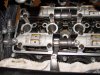
From there it's easy. I like to check valve clearance with cylinder on the compression cycle, meaning all 4 valves (intake + exhaust) are close. You will need to do it 4 times with 2 turns on the crank, or 1 complete turn on the cams. Either way we're talking the same language... If you use the cam as reference, each 90 degree will have 1 cycle. On the crank is every 180 degree.
All you need is a feeler gauge...
Intake : 0.005 to 0.008 Exhaust 0.009 to 0.011
From there if everything is within spec, you're good for another 26K miles. If not, take notes... Remove the cams... measure your shims and compensate for the right one. You can buy the one you need only, or buy a shims kit...
Went all done, reassembly everything! I was lucky not to brake any gaskets. I just put a LITTLE BIT!!! of silicone. Next time I'll change the gasket on the side cover.
Take your time, measure twice, or three times... Good luck!
One more thing I want to had... Turn the engine CW only, the way it usually turn. Turning the other way around will put excessive load on the chain tensioner...
So, I will assume that you can remove the seats, gas tank and air box. If you can get through those step on your own you can either read other threads, or simply bring your bike to a dealership near you...lol
Step1:
Once you get to the point that you can actually see the valve cover, throttle body... we're getting started. In order to be able to remove the valve cover you need to move the throttle body assembly out of the way. Basically you need to disconnect the throttle cable (2 Phillips screws), loosing up the 4 collars on each intake runner (3mm Allen key)
To have access to the throttle plate, you need to remove the big black plate on the right hand side (4 bolts - 12mm socket). Once that's out of the way, remove the 2 Phillips screws to remove the cable holder from the throttle assembly, then disconnect the cables. Use a long extension with a 3mm Allen socket and loosing up all 4 screws on the collars. When that's done, just pull up on the throttle assembly. You won't be able to pull it all out since the coolant hose is still attach, but it's ok.
Step2:
Disconnect the spark plug cables. Remove the 6 bolts on top of the valve cover (5mm Allen key). Pull up on the cover, then back a little and rotate CCW to clear the frame rail. Push the throttle assembly out of the way then the valve cover will get out easy. At this point you can see the cams and all the other goodies. You can also remove the spark plugs at this point, It make it much easier to spin the crankshaft...
Step3:
Remove the timing chain cover on the right hand side of the engine (5mm Allen key) and just put it on the side. You can use a ty-rap to keep it out of the way. A good 3/8" drive ratchet with a 12mm socket will fit on the center bolts. Remove the gasket and line up the "T" timing mark with the mark on the case (left) The mark on the cams gear should line up with the edge of the head also.
Step4:
From there it's easy. I like to check valve clearance with cylinder on the compression cycle, meaning all 4 valves (intake + exhaust) are close. You will need to do it 4 times with 2 turns on the crank, or 1 complete turn on the cams. Either way we're talking the same language... If you use the cam as reference, each 90 degree will have 1 cycle. On the crank is every 180 degree.
All you need is a feeler gauge...
Intake : 0.005 to 0.008 Exhaust 0.009 to 0.011
From there if everything is within spec, you're good for another 26K miles. If not, take notes... Remove the cams... measure your shims and compensate for the right one. You can buy the one you need only, or buy a shims kit...
Went all done, reassembly everything! I was lucky not to brake any gaskets. I just put a LITTLE BIT!!! of silicone. Next time I'll change the gasket on the side cover.
Take your time, measure twice, or three times... Good luck!
One more thing I want to had... Turn the engine CW only, the way it usually turn. Turning the other way around will put excessive load on the chain tensioner...
Attachments
-
 96.5 KB Views: 460
 -
 94.9 KB Views: 409
 -
 87.4 KB Views: 405
 -
 95 KB Views: 390
 -
 93.1 KB Views: 400
 -
 92.4 KB Views: 383
 -
 96.9 KB Views: 415
 -
 96.9 KB Views: 383
 -
 98.2 KB Views: 400
 -
 99.1 KB Views: 430
Last edited:
