'13 FZ6R Streetfighter


pengwan87

New Member
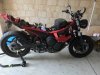
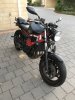
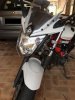
So about 18 months ago I layed the bike down on its side around a bend and scratched the bike and cracked the front fairing, I ripped all the fairings off and then used a hacksaw to cut down the headlight fairing. Essentially doing the cheapest crappest naked conversion out there, resigning to either one day repair the bike or turn it into an XJ6.

And so a couple of weeks ago I started googling and saw a completely different take on the naked look, enter the "street fighter". pretty much just throw out the whole headlight assembly and mirrors, get some bar end mirrors and a round headlight and hey presto done. Except that would be too easy and not doing the bike justice. So I looked at everything I didn't like about the bike and what I wanted to change;
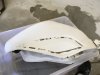
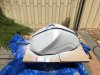
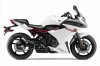
-it's white, I wasnt the greatest fan of the white, it was the contrast between the red frame and white that I like, but in the end it's white and I dont like it, sweet paint it black.
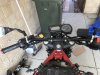
-gigantic bar ends, these probably did save a bit of damage in the crash but they're huge and ugly, out.
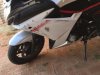
-rear tail, stick a wheel on it and it could become a wheelie bar, its fricken huge. I bought som cheap as brackets from the hardware store ages ago and made my own $5 tail tidy, it looked average but did the job. time to do it properly.
-massive indicators, yes I get it's about being seen but smaller and brighter will do the job just fine, actually did this after the crash 'cause 2 of the old ones broke but the front would need to be relocated. LED's of course
-Headlight, not really an issue itself but I liked the "caferacer" style round light, so off it comes.
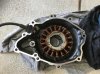
-scratched up stator cover- separate issue but time to get fixed regardless, felt like an idiot riding with this for so long. Ordered.

Alrite straight to google for parts.........

IMG_2830 (360x270).jpg

IMG_4301 -(270x360).jpg
 

pengwan87

New Member
droppin dollar dollar bills

So I wanted to try order as much as I could within Australia to support home business but did have to get a couple of things from the U.S and also bought a flyscreen faring from China that in the end I did not use.

I sourced most of the parts from thirdgear.com.au;

2 x Alloy Motorcycle Mirror Block Mount
1 x Flush Mount Universal Bar Ends - Red
1 x 49 MM Front Fork Mount Headlight Brackets - Black
1 x Sport Bike 10mm Motorcycle Mirrors - Carbon Style
1 x Metal Cafe Racer Classic Headlight - 7.7"
1 x Low Rider Handlebars 22 MM - Satin Black
1 x Adjustable Tail Tidy - Black

and then went to partzilla.com for the stator cover and gasket.

Then I had decided on matte black for the paint so off to bunnings;

4x Duramax flat black-spray cans
1x Duramax plastic primer
1x Duramax metal primer

The indicators I got awhile back are from my local Yamaha store Midvale Yamaha, great guys always up for a chat though it is predominantly a dirt bike shop.

4x mini LED indicators-no inline resistors, I prefer them to flash faster.
 

pengwan87

New Member
The build begins

So as stuff arrived I began stripping the bike down and did very little in the way of making sure I kept track of nuts and bolts I'd need for later or how things generally come apart and go back together. So hot tip for next time, take more photos of deconstruction, segregate nuts, bolts, plugs, and label stuff.

Given I'd already removed the side fairings and half the front it wasn't hard finishing off the headlight and mirrors. Mirrors off, remaining fairing off, unplug everything, and unbolt from frame. Detach the instrument gauge unit thingy and remount........uh, back to bunnings for some $1 brackets. Bent these into shape a bit of an Z shape that I saw in another persons build and mounted the unit straight onto the underside of the triple tree using a couple of existing screws that are used for the key barrel mounts.

Bolted on the brackets for the headlight onto the forks and had a go at installing the new headlight. This headlight is huge, also sealed, luckily the globe is the exact same watt as the original, also came with an extension for the 3 pin lead which was needed as the rear dome goes back a long way. Took a few goes before I was happy with were it sat, had to adjust positioning of wiring harness and throttle cables, and eventually got it sitting nice and high.

Front indicators also needed relocating, didn't like them up the front, so utilized some leftover brackets from the fairings which also act as throttle cable guides, and now the are mounted on the side towards the front.

Next came stripping it down for painting, replacing the handle bars and mounting the all new set-up......
 

pengwan87

New Member
the build continues

So seats come off, pillion handles, rear plastics, and now I find where the wiring pins are for rear lights and indicators, yay can further tidy up my previous attempt at the tail tidy. Front fender off and all bolts, nuts and plugs thrown into same box, good job idiot. Siphon out the fuel and then Tank comes off, 3bolts? too easy, couple of drops of fuel caught by a rag, and for some reason had the brain wave of taking a pic of where all the plugs go, genius.

Next is off with handle bars and everything attached to them, this was pretty easy to do except the clutch side grip that I ruined getting off, yet to replace but its on the future shopping list. New bars are slightly longer and have less of a rise in them so are kinda semi-drag bars, the curve was also close the end so adding mirror mounts into the mix has made this a pretty cramped area, brake fluid reservoir now sits on a slight angle, pretty sure it won't matter......, added the new slim red bar ends- now the rubber that goes in the handle bar on these is a bit to small so they don't fit perfect, spotted some better fitting ones at the yamaha shop and will replace these later.

Old tail tidy off, new one straight on, still had to utilize some cheap brackets to mount it but in the end I think it looks pretty good, tidy up my terrible wiring I previously did and mounted the plate light and indicators.

Sanding, sanding, and sanding........actually wasn't that bad, wet sanded the plastics and took off the clear and a fair bit of paint, then used a plastic primer as a base coat to help the paint bond. 3 good layers of matte black done in a day and the plastics look mint. I trial painted some of the old damaged plastics and decided against putting a clear on top, it made it too glossy and it's easy enough to remove plastics and redo if they get scuffed up later down the track.

IMG_6291 (360x270).jpg

IMG_6292 (360x270).jpg
 

pengwan87

New Member
The tank

Now the tank was a bit off a pain in the ***, the side plastics on the tank are put on with double sided tape, the plastics pop straight off leaving the tape stuck to the metal. Pretty sure the glue on the tape was invented by satan, this shit just doesnt come off, acetone, scraping, hair drying, sanding, did next to nothing, I got most of it off by actually just rubbing at it with my fingers, probably have no finger prints left. In the end I figure the plastics would end up back on anyway so near enough was good enough, don't judge me.

IMG_6298 (360x270).jpg

Wet sanded the rest of the tank taking off all the clear, removed the logo stickers which were also taped on but this came off a bit easier, sanded some more and then set up my painting area. Was a bit windy and also pretty sunny and hot, not the best conditions for painting outdoors but it was due to rain the rest of the week so stuff it, get into it. Removed the tank cap, can't seem to get key out? wierd but a non issue. 2 good coats of metal primer as a base and she's ready to paint.

IMG_6299 (360x270).jpg

Now as I started painting the wind and sun become a pain, blocked the wind best I could and had to spray slightly closer than I would've like to limit overspray and paint drying before it hit the tank. Ended up doing 4 separate coats, and really paid attention to the back of the tank that I lean on so paints extra thick there to deal with the extra wear it deals with. Due to spray can technique in the end its not perfect, you can kinda see lines in the paint and it's a little rough on the surface with the odd sprinkle of excess paint or maybe dust due to the wind. In the end I'm happy with it and can always give it a light sanding on a better day and one last coat to finish it off. It also looks like the tank could handle a layer of clear coat, so I may try hunt down some flat clear coat, which I couldn't find at bunnings, and put that on another day.
 
Last edited:

pengwan87

New Member
Time to put humpty together again.

So remember how I didn't do an organised strip down? yeh this became a bit of a pain during the rebuild, but in the end I found most if not all the bits I needed and got it all back together. A couple of times I came across odd looking plugs and washers, realising where the came from and had to pull things back off and put them together again properly. I got lucky this time but in the future I'll definetly be a bit more organised.

At this point I also decided to replace the stator cover which I imagined would be fairly straight forward, after reading a few threads on here and consulting google I realised it was a bit harder than I'd thought. Gloves were a great idea I picked up from here, that cover is sharp, and when your trying to undo those inside screws your gonna mess your hands up real quick. So got the bike on the rear stand to keep it straight and then removed cover, only a couple of drops of oil caught by drip tray and off it comes. I then realised I couldn't undo the stator from the cover in place, and that the plug on the lead is to big to fit between engine block and the frame? good job yamaha engineers......so I cut the wires, labelled them, and got myself more room to work with.

IMG_6300 (360x270).jpg

I still couldn't get them undone, these 4 screw, even the one just for the wire bracket, are put in with 10Nm of force. So I took a drive over to the guys at Midvale Yamaha and asked for a favour, $25 later and they even fitted the stator in the new cover for me making sure it was again impossible to remove. Back home and installed stator and rewired the plug. Done, eventually.
 

pengwan87

New Member
Finished

And so this is the end result, for now. Still got a few little things to do but the major stuff is done, I'm really happy with how it turned out, the bike is looking mint and pretty unique. The tank is looking pretty bare so I might get a big red Yamaha tuning fork logo sprayed on there, definitely need some smaller black levers, and I'm sure I will spot some other things to touch up later, including coming up with some way of covering up the compliance plate a bit.

IMG_6302 (360x270).jpg

IMG_6304 (360x270).jpg

IMG_6311 (360x240).jpg

There's one last big thing I'm thinking of doing to it which is to lower it, not for height reasons I touch the ground fine, but I think the lower stance would really suit it. Feel free to offer up suggestions, tell me you hate it, love it, think I'm an idiot, whatever.
I've also not bothered to give step by step instructions in this thread as there is already a lot on here already but if anyone needs specifics on any of it just ask and I'm happy to try elaborate, but FYI I'm all about just fumbling through things and checking in with google and forums as I go so maybe don't haha.

Anyway hope you like it, hope it inspires others to make their bike individual to them, cruiser, race, scooter, vintage, cafe, streetfighter, its all the same wind in the face at the end of the day.
 
Last edited:

leprecaun jon

ESTABLISHED RESIDENT
Elite Member

JSP

Super Moderator
Lookin good! .
 

pengwan87

New Member
Hey gonna revive this old thread as I finally started getting back into messing with the bike. I've made a few more changes recently which I haven't put up here, the biggest change being getting rid of the whole stock exhaust system, from headers through to the tip. I've installed a complete Delkevic system, I cannot believe how cheap it was, half the price of the 2brothers kits I'd been looking at previously. I'll chuck up some pics when I get the chance of how the new system looks but if your interested just go to: http://www.delkevic.com.au/index.php?route=product/product&path=106668_108167_108206_108215&product_id=61423
There are a fair few options there depending on the look you want, I'm not the biggest fan of any of the slip ons but they won't sell the pipes without one. Can always change it in the future.
Other than that I've removed a few small items off the bike and relocated the front indicators again, nothing else major.

But going forward I'm going to start making some bigger changes, first will be to relocate the key/ignition barrel, really need to tidy up the wiring at the front end and get the headlight mounted closer to the bike.
Most likely going to go down the cafe racer path and get rid of the handle bars and go for clip ons, or may just go for level bars with no rise in them.
And the biggest change coming is going to be chopping the back seat off. Going to take alot more thinking and planning than the rest of what I've done and am planning but it's the last part of the bike that keeps it looking like just a naked fz6r.

In the next 2 weeks I'll be removing the exhaust system again as I've just picked up some black exhaust wrap, so I'm going to wrap from the headers all the way to the slip on.
I'll take some before and after pics of that.

Anyway I'll try update this thread as I go incase anyone is looking for inspiration or needs a reason to not do any of this to their bike haha.


Top